 WordPress で Magnific Popup を使ってみる
2014年6月5日
Magnific Popup を WordPress で使う際のメモ。

現時点ではまだ WordPress 用のプラグインはできていないが、いずれはプラグイン化されるとのこと。
License
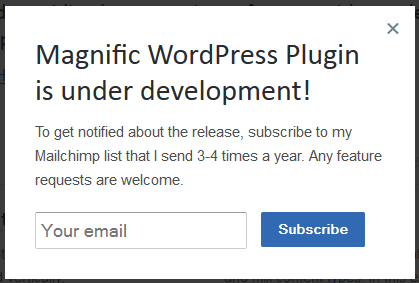
Script is MIT licensed and free and will always be kept this way. But has a small restriction from me – please do not create public WordPress plugin based on it(or at least contact me before creating it), because I will make it and it’ll be open source too (want to get notified?).
目次
基本的な使い方等については、よろしければ以下をご覧ください。
関連ページ:Magnific Popup を使って見る
Magnific Popup のダウンロードと読み込み
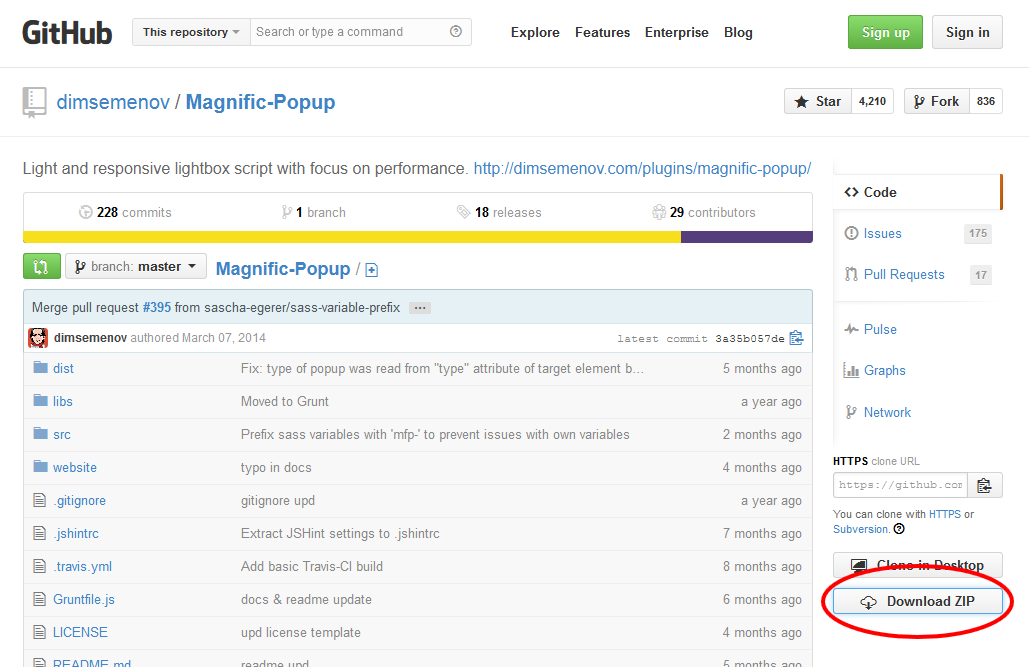
Magnific Popup を「配布ページ」からダウンロード(ページ右側の「Download ZIP」から)
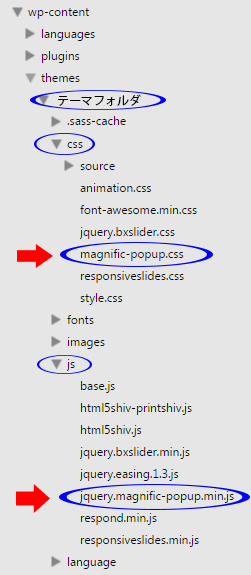
ダウンロードすると「dist」というフォルダがあるのでその中の「jquery.magnific-popup.min.js」と「magnific-popup.css」をコピーして適当なフォルダに配置。
この例では WordPress のテーマフォルダ内に配置
以下は配置したファイルを functions.php で読み込む例。(jQuery を CDN から読み込んでいるが、これはオプション)
読み込み方はいろいろあるので、環境に応じてやりやすい方法で。
function add_my_scripts() {
  if(is_admin()) return;
  wp_deregister_script( 'jquery');  //jQueryをCDNから読み込む
  wp_enqueue_script( 'jquery', '//ajax.googleapis.com/ajax/libs/jquery/1.10.2/jquery.min.js', array(), '1.10.2', false);
  wp_enqueue_script( 'jquery-mig', '//cdnjs.cloudflare.com/ajax/libs/jquery-migrate/1.2.1/jquery-migrate.min.js', array(), '1.2.1', false);

  //「jquery.magnific-popup.min.js」を読み込む
    wp_enqueue_script('mp',
    get_template_directory_uri(). '/js/jquery.magnific-popup.min.js',
    array('jquery'),
    '20140xxxx'
  );
}
add_action('wp_enqueue_scripts', 'add_my_scripts');

function register_style() {
  wp_register_style('style', get_template_directory_uri() .'/css/style.css');
  //「magnific-popup.css」を読み込む
  wp_register_style('mp', get_template_directory_uri() .'/css/magnific-popup.css');

}
function add_stylesheet() {
  register_style();
  wp_enqueue_style('style');
  wp_enqueue_style('mp');
}
add_action('wp_enqueue_scripts', 'add_stylesheet');
アイキャッチ画像をポップアップ表示
Magnific Popup の機能を使う際に HTML 要素を直接指定する場合は a 要素に任意の class 名や id 名を付与して、href 属性にモーダルウィンドウで表示したい画像などのパスを記述する。
HTML
<a class="image-popup-link" href="path-to-image.jpg">Open popup</a>
HTML で記述した class 名 id 名に対してプラグインを実行。
jQuery
jQuery(function($){
    $('.image-popup-link').magnificPopup({
        type: 'image'
        // その他のオプション(必要であれば)
    });
});
この方法でアイキャッチ画像を表示する場合の例。
- テンプレートファイルのループ内で、アイキャッチ画像のフルサイズのパスを取得
- アイキャッチ画像の出力を a 要素で囲み、href 属性にフルサイズのパスを指定
<?php get_header(); ?>
<div id="main">
<?php if(have_posts()) : ?>
<?php while(have_posts()): the_post(); ?>
<h2><?php the_title(); ?></h2>

<div class="events_photo">
//アイキャッチ画像がある場合
<?php if(has_post_thumbnail()): ?>
<?php
    $thumbnail_id = get_post_thumbnail_id($post->ID);
    $src_info = wp_get_attachment_image_src($thumbnail_id, 'full');
    //フルサイズのパスを取得して変数 $src へ格納
    $src = $src_info[0];
?>
<div id="thumbnail_photo">
    <p>
        //a 要素の href 属性に $src を指定
            <a class="image-popup-link" href="<?php echo $src; ?>">
            <?php the_post_thumbnail('medium'); ?>
        </a>
    </p>
</div>
<?php endif; ?>
</div><!-- end of .events_photo -->

<div class="event_contents"><?php the_content(); ?></div>

<?php endwhile; ?>
<?php endif;?>
a 要素のクラス名(image-popup-link)を使って Magnific Popup の機能を有効化
jQuery(function($){
    $('.image-popup-link').magnificPopup({
       type: 'image',
        image: {
      //カーソルを通常のものに
      cursor: null
    }
    });
});
投稿に挿入した画像をポップアップ表示
テンプレートファイルは前述のものと同じ。
投稿に挿入した画像は the_content(); の中で出力される。(※)
以下の例はコンテンツを囲む div 要素のクラス名を「event_contents」と指定。
<?php get_header(); ?>
<div id="main">
<?php if(have_posts()) : ?>
<?php while(have_posts()): the_post(); ?>
<h2><?php the_title(); ?></h2>

<div class="events_photo">
<?php if(has_post_thumbnail()): ?>
<?php
    $thumbnail_id = get_post_thumbnail_id($post->ID);
    $src_info = wp_get_attachment_image_src($thumbnail_id, 'full');
    $src = $src_info[0];
?>
<div id="thumbnail_photo">
    <p>
            <a class="image-popup-link" href="<?php echo $src; ?>">
            <?php the_post_thumbnail('medium'); ?>
        </a>
    </p>
</div>
<?php endif; ?>
</div><!-- end of .events_photo -->

//コンテンツの出力
<div class="event_contents"><?php the_content(); ?></div>

<?php endwhile; ?>
<?php endif;?>
Magnific Popup の機能を使う場合、複数の要素を含む1つの親要素に対して指定することも可能なのでその方法を利用。
- 複数の要素の親要素に対して指定する場合、それぞれの子要素の href 属性に表示したい画像のパスなどを指定。
- 親要素に任意の class 名や id 名を付与。
HTML
<div class="parent-container">
  <a href="path-to-image-1.jpg">Open popup 1</a>
  <a href="path-to-image-2.jpg">Open popup 2</a>
  <a href="path-to-image-3.jpg">Open popup 3</a>
</div>
親要素の class や id に対してプラグインを実行
delegate:それをクリックするとモーダルウィンドウを開く要素のセレクタ
jQuery
jQuery(function($){
    $('.parent-container').magnificPopup({
        delegate: 'a', // 子要素のセレクタ
        type: 'image'
        // other options
    });
});
WordPress の投稿に挿入された画像は以下のように出力されている。(クラスや width 等は省略)
<div class="event_contents">
中略
<p>
    <a href="http://localhost/wp-content/uploadsx/2014/06/x01.jpg">
        <img src="http://localhost/wp-content/uploadsx/2014/06/x01-150x150.jpg">
    </a>
</p>
<p>
    <a href="http://ocalhost/wp-content/uploadsx/2014/06/x02.jpg">
        <img src="http://localhost/wp-content/uploadsx/2014/06/x02-150x150.jpg">
    </a>
</p>
</div>
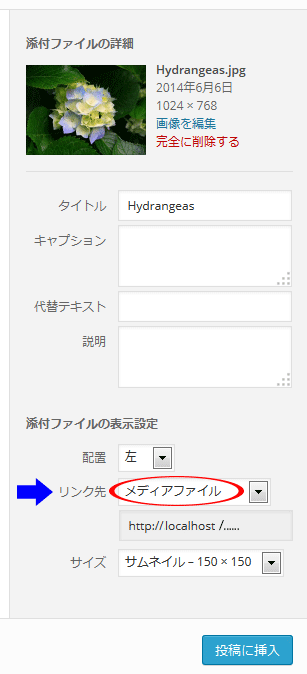
a 要素の href 属性の値は画像を挿入(メディアを追加)する際に「リンク先」で「メディアファイル」を選択して、フルサイズの画像へのパスが設定されるようにする。
挿入した画像の親要素のクラス名(event_contents)を使って Magnific Popup の機能を有効化。
また、挿入した画像をギャラリー表示したい場合は「gallery: {enabled:true}」を指定。
jQuery(function($){
     $('.event_contents').magnificPopup({
          delegate: 'a', // 子要素のセレクタ
          type: 'image',
          image: {
               cursor: null
          },
          gallery: {
               //ギャラリー表示にする
               enabled:true
          }
     });
});
※
但し、この場合「delegate: ‘a’」としているので「the_content()」で出力される内容(記事の本文)の中の全ての a 要素が対象になってしまうので、通常のリンクがその中にある場合それらもポップアップの対象とみなされてしまい「Loading…」や「The image could not be loaded」などのメッセージが表示される。
これに対処するには以下のような方法が考えられる。
- :not() を使用して特定のリンクを除外する
- 対象とする要素を工夫する
- preg_replace を利用して a 要素にクラス名を追加する等
- 上記の方法を組み合わせる(その他の例)
対象とする要素を工夫する
$(‘対象とする要素’).magnificPopup({...})
「メディアを追加」で画像を挿入する際に、挿入される画像を例えば、<p class=”popup_photo”><p> で囲む。
そして対象とする要素を「p.gallery a」と指定する。
$('p.popup_photo a').magnificPopup({
   type: 'image',
  image: {
    cursor: null
  },
  gallery: {
    enabled:true
  }
});
投稿の作成・編集の際に、ポップアップする画像を特定の div 要素(例:class=”gallery”)で囲んで jQuery では以下のように指定。
$('.gallery').magnificPopup({
  type: 'image',
  delegate: 'a',
  image: {
    cursor: null
  },
  gallery: {
    enabled:true
  }
});
この他にも対象とする要素や「delegate:」の対象を工夫するなどすればいろいろな方法が可能と思われる。
preg_replace を利用
記事の本文中の画像へのリンクを書き換える
この方法を使えば、すでに挿入されている画像もポップアップの対象にできるのと、特に画像などにクラスを毎回指定しないで済む。
- 記事の本文を「get_the_content()」を使って変数($content)に格納
- preg_replace() で 挿入されている画像のリンク(a 要素)にクラス(例:class=”mpg”)を追加
- get_the_content() はフィルタ処理されていないコンテンツを返すので、the_content() で出力するのと同じにするには「apply_filters(…)」と「str_replace(…)」を適用
挿入されている画像のリンクを検索するパターンは「/wp-content/uploads/」を含む a 要素にしているが、必要に応じて変更する。
以下をテンプレートの the_content() での出力に置き換える。
<?php
$content = get_the_content();
$content = preg_replace('/(<a )([^>]*"http(s)?:[^">]*\/wp-content\/uploads\/[^">]*"[^>]*>)/u', '$1 class="mpg" $2', $content);
$content = apply_filters('the_content',$content);
$content = str_replace( ']]>', ']]>', $content );
echo $content;
?>
jQuery では、クラス(class=”mpg”)が付いた a 要素を対象にする。
$('.mpg ').magnificPopup({
     type: 'image',
    image: {
      cursor: null
    },
    gallery: {
      enabled:true
    }
    });
get_the_content() は改行処理やショートコードの変換などをしていない値を返す。the_content() で出力するのと同じにする方法は以下のページの「Alternative Usage」に記載あり。
Codex Function Reference/the content
Please note! get_the_content will return the unfiltered content. If you want to achieve the same output that the_content() returns, use the following code:
<?php $content = apply_filters( 'the_content', get_the_content() ); $content = str_replace( ']]>', ']]>', $content ); ?>
image_send_to_editor フックを利用
この場合、以下を functions.php に記述後に挿入された画像に対して有効になる。(それまでにメディアから追加した画像は対象外)
image_send_to_editor フックを利用してメディアから追加する画像のタグに自動的に class を追加する。
function.php に以下を記述。
function add_linked_images_class($html, $id, $caption, $title, $align, $url, $size, $alt = '' ){
  $classes = 'image-popup-link'; // separated by spaces, e.g. 'img image-link'

  // a 要素にすでにクラスがある場合は追加。
  if ( preg_match('/<a.*? class=".*?">/', $html) ) {
    $html = preg_replace('/(<a.*? class=".*?)(".*?>)/', '$1 ' . $classes . '$2', $html);
  } else {
    $html = preg_replace('/(<a.*?)>/', '$1 class="' . $classes . '" >', $html);
  }
  return $html;
}
add_filter('image_send_to_editor','add_linked_images_class',10,8);
参考にしたサイト:Add rel or class to image links
参考になるサイト:WordPress のエディタに埋め込むメディア用タグを自動編集する
その他の例
前述の「preg_replace を利用」の場合、投稿に挿入された画像全てが対象になるが、ある画像は単独で、またある画像はギャラリー表示したい場合の例。
投稿の HTML でギャラリー表示したい画像は、<div class=”gallery”> の中に挿入する。
<!-- 単独で表示する画像の挿入 -->
<a  class="mpg" href="http://localhost/wp-content/uploads/2014/06/201310_00.jpg"><img src="http://localhost/wp-content/uploads/2014/06/201310_00-160x160.jpg" alt="" width="160" height="160" class="alignleft size-thumbnail wp-image-145" /></a>

<h3>フォトギャラリー</h3>
<div class="gallery">
<!-- ギャラリー表示する画像の挿入 -->
<a  class="mpg" href="http://localhost/wp-content/uploads/2014/06/201310_01.jpg"><img src="http://localhost/wp-content/uploads/2014/06/201310_01-160x160.jpg" alt="" width="160" height="160" class="alignleft size-thumbnail wp-image-146" /></a>

<a  class="mpg" href="http://localhost/wp-content/uploads/2014/06/201310_02.jpg"><img src="http://localhost/wp-content/uploads/2014/06/201310_02-160x160.jpg" alt="" width="160" height="160" class="alignleft size-thumbnail wp-image-147" /></a>

....
</div>
テンプレートの記述(本文の出力を <div class=”event_contents”> で囲む)
<div class="event_contents">
<?php
$content = get_the_content();
$content = preg_replace('/(<a )([^>]*"http:[^">]*\/wp-content\/uploads\/[^">]*"[^>]*>)/u', '$1 class="image-popup-link" $2', $content);
$content = apply_filters('the_content',$content);
$content = str_replace( ']]>', ']]>', $content );
echo $content;
?>
- 上記の記述で投稿に挿入されている全ての画像へのリンクにはクラス「image-popup-link」が付く。
- 単独でポップアップさせるものは not() を使って<div class=”gallery”> 内の画像を対象外とする。
- ギャラリー表示するものは「delegate: ‘.gallery a’」として指定する
$('.image-popup-link').not('.gallery a').magnificPopup({
   type: 'image',
    image: {
    cursor: null
  }
});

$('.event_contents ').magnificPopup({
  delegate: '.gallery a',
   type: 'image',
  image: {
    cursor: null
  },
  gallery: {
    enabled:true
  }
});
タイトルを表示
ポップアップ表示させた際にタイトルを表示する方法。
タイトルを表示するには image: {} の中で、titleSrc に(この例の場合は a 要素の)タイトルが記述されている属性を指定する。
image: {
  titleSrc: 'title'
  // Attribute of the target element that contains caption for the slide.
  // Or the function that should return the title. For example:
  // titleSrc: function(item) {
  //   return item.el.attr('title') + '<small>by Marsel Van Oosten</small>';
  // }
}
但し、WordPress の出力する a 要素にはそれに該当する属性がない。
WordPress ではメディアを追加する際に、「添付ファイルの詳細」でタイトルを指定できるが、それは img 要素の alt 属性として出力される。(デフォルトでは拡張子なしの画像ファイル名が指定されている)

挿入された画像の出力。
<a href="http://localhost/wp-content/uploadsx/2014/06/Hydrangeas.jpg">
    <img alt="Hydrangeas" src="http://localhost/wp-content/uploadsx/2014/06/Hydrangeas-150x150.jpg">
</a>
ポップアップ表示の際にタイトルを表示するには、
- メディアを追加する際に、「添付ファイルの詳細」でタイトルを指定
- image: {} の中で、titleSrc に function(item) {...}を使って img 要素の alt 属性を指定
以下は、投稿に挿入した画像をポップアップ表示する際にタイトルを表示させる例。
「item.el」が a 要素に該当するので、その子要素の img 要素を探してその alt 属性を指定。
jQuery(function($){
    $('.single_event_contents ').magnificPopup({
        delegate: 'a', // 子要素のセレクタ
        type: 'image',
        image: {
            cursor: null,
            titleSrc: function(item) {
                return item.el.find('img').attr('alt');
            }
        },
        gallery: {
      enabled:true
        }
    });
});
Youtube をポップアップ表示
- ショートコードを使って YouTube のサムネイル画像を表示
- YouTube のサムネイル画像をクリックすると YouTube をポップアップ表示
- ギャラリー表示を有効にする
以下を functions.php に記述してショートコードで YouTube のサムネイル画像を表示する。
function popup_yt_func($atts) {
  extract(shortcode_atts(array(
    "id" => '',
    "size" => 'mqdefault',
    "title" => ''
  ), $atts));
  return '<div class="yt_tn_image"><a href="http://www.youtube.com/watch?v='.$id.'" title="'.$title.'"><img src="http://i.ytimg.com/vi/'.$id.'/'.$size.'.jpg" alt=""></a></div>';
}
add_shortcode("popup_yt", "popup_yt_func");
YouTube のサムネイル画像 (src)
サムネイルのサイズ
- mqdefault.jpg ( 320×180 ) 通常使用されるサイズ
- hqdefault.jpg または 0.jpg ( 480×360 ) 4:3 のサイズ。
- default.jpg ( 120×90 )
- 1.jpg または 2.jpg または 3.jpg ( 120×90 ) 場面を YouTube 側で取ったサムネイル
- maxresdefault.jpg ( 1280×720 ) 最大サイズ。但し元の動画が HD 以上でないと生成されない
投稿などに以下のように記述。
- id : YouTube 動画の ID
- size : サムネイルのサイズ(拡張子を除いたもの)
- title : ポップアップ表示した際に表示するタイトル
[popup_yt id="45ryhFK-kpQ" size="default" title="Pat Metheny Trio"]
スタイルを必要に応じて指定。
.mfp-title はポップアップ表示した際に表示するタイトルの div 要素のクラス。但し、他の画像のポップアップのタイトルと区別するためにその親要素「.mfp-iframe-scaler」を指定。
style.css 等
.yt_tn_image {
  margin: 20px 0;
}

.mfp-iframe-scaler .mfp-title {
  position:absolute;
  padding: 5px;
  color: #FFF;
}
jQuery は以下のように記述。「type」を「iframe」に指定。
jQuery
jQuery(function($){
  $('div.yt_tn_image').magnificPopup({
      delegate: 'a',
      type: 'iframe',
      iframe: {
        markup: '<div class="mfp-iframe-scaler">'+
        '<div class="mfp-close"></div>'+
        '<iframe class="mfp-iframe" frameborder="0" allowfullscreen></iframe>'+
        '<div class="mfp-title">Some caption</div>'+
        '</div>'
      },
      gallery: {
        enabled:true
      },
      callbacks: {
        markupParse: function(template, values, item) {
          values.title = item.el.attr('title');
        }
      }
    });
});
Youtube の表示をレスポンシブ対応に
本題(Magnific Popup)とは関係ないが、Youtube を WordPress で表示する際のメモ。
Youtube を表示するショートコードを functions.php に記述。width 等も指定しているが、CSS で指定は上書きされるのであまり意味はない。
id :Youtube 動画の ID
function youtube_func($atts) {
  extract(shortcode_atts(array(
    "id" => '',
    "width" => '640',
    "height" => '360'
  ), $atts));
  return '<div class="yt_wrapper"><div class="youtube"><iframe width="'.$width.'" height="'.$height.'" src="http://www.youtube.com/embed/'.$id.'" frameborder="0" allowfullscreen></iframe></div></div>';
}
add_shortcode("youtube", "youtube_func");
ショートコードは投稿などに以下のように記述。
[youtube id="45ryhFK-kpQ"]
動画の縦横比は「padding-bottom」で指定。
16:9 の場合 → 9 ÷ 6 = 56.25(幅の 56.25% を高さとする設定)
CSS(style.css 等)
.youtube {
    position: relative;
    padding-bottom: 56.25%;
    padding-top: 25px;
    height: 0;
    overflow: hidden;
}

.youtube iframe {
    position: absolute;
    top: 0;
    left: 0;
    width: 100%;
    height: 100%;
}

.yt_wrapper {
  max-width: 640px;
  min-width: 280px;
  margin: 20px 0;
  border: 1px solid #CCC;
}
関連ページ:「Youtube (iframe) をレスポンシブ対応に」
Google Map をポップアップ表示
「地図を表示」というリンクをクリックすると、Google Map をポップアップ表示させる例。
以下を functions.php に記述してショートコードで「地図を表示」というリンクを表示する。
function popup_gmap_func($atts) {
  extract(shortcode_atts(array(
    "address" => '',
    "text" => '地図を表示',
    "title" => 'Google Map'
  ), $atts));
  return '<div class="popup_gmap"><a data-mfp-src="" href="">'.$text.'<span class="address">'.$address.'</span><span class="map_title">'.$title.'</span></a></div>';
}
add_shortcode("popup_gmap", "popup_gmap_func");
ショートコードの記述例
address:住所を指定(必須)
text:リンクのテキスト(省略時は「地図を表示」と表示される)
title:地図の下に表示するタイトルを指定(省略時は「Google Map」と表示される)
[popup_gmap address="東京都港区芝公園4−2−8" title="東京タワー周辺の地図"]
jQuery は以下のように記述。「type」を「iframe」に指定。
クラスが「popup_gmap」の要素があれば以下を実行
- クラスが「address」の span 要素のテキスト(住所)を変数「address」に取得
- 取得したテキスト(住所)の前後の空白を取り除き、内部の空白を「+」で置換。
- $.param()を使って値を、URLクエリ文字列の形式でシリアライズ
- それを「”https://maps.google.com/maps?”」に加えたものを URL とする
- URL は a 要素の「data-mfp-src 属性」に設定。
- 「href 属性」にも URL を設定。(600px 未満の場合、Google Maps のページへ移動)
jQuery(function($){
    if($('.popup_gmap').length > 0) {
        $('.popup_gmap a').each(function() {
            var address = $(this).find('span.address').text();
            address = $.trim(address);
            address = address.replace(/\s+/g, '+');
            var map_param = $.param({
                'q': address
            });
            $(this).attr('data-mfp-src', "https://maps.google.com/maps?" + map_param);
            $(this).attr('href', "https://maps.google.com/maps?" + map_param);
        });

        $('.popup_gmap a').magnificPopup({
            disableOn: 600,
            type: 'iframe',
            iframe: {
                markup: '<div class="mfp-iframe-scaler">'+
                        '<div class="mfp-close"></div>'+
                        '<iframe class="mfp-iframe" frameborder="0" allowfullscreen></iframe>'+
                        '<div class="mfp-title"></div>'+
                        '</div>'
            },
            callbacks: {
                markupParse: function(template, values, item) {
                    values.title = item.el.find('span.map_title').text();
                }
            }
        });
    }

});
ショートコードの要素やタイトル、リンクのスタイルを CSS に指定
style.css 等
.popup_gmap span.address, .popup_gmap span.map_title {
  display: none;
}

.mfp-iframe-scaler .mfp-title {
  position:absolute;
  padding: 5px;
  color: #FFF;
}

.popup_gmap {
  margin: 1em 0;
}
New Web 制作リファレンス
関連ページ
![]()