acmailer3 を使ってみた際のメモ。「不着メール設定」で少しはまった。今回試した共用サーバー(inMotion)では、「.forward」の機能が使えないことが判明したので cPanel の E-mail の「Forwarders」を利用。
ダウンロード
以下のページからダウンロード(今回ダウンロードしたバージョン:acmailer3.8.14 正式版)
「perl パス」を選択してダウンロードをクリック。
http://www.acmailer.jp/download/index.html
インストール
http://www.acmailer.jp/download/install.html
- 設置したいサーバーに、インストール用ディレクトリ(名前は何でもよい。この例では「acmailer3」)を作成・パーミッション(755など)の設定を行う。
- 作成したインストール用ディレクトリに install.cgi をアップロード
- install.cgi にアクセス(例:http://xxxxxx.com/acmailer3/install.cgi)
- 後は、説明に従って進むと自動的にacmailerがインストールされる
- インストール完了後、install.cgiを削除
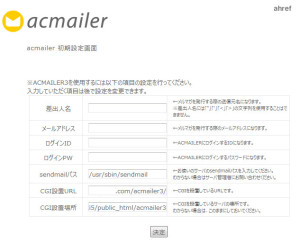
インストールに成功すると、ログイン画面が表示されるので、必要事項(ログインID,パスワードなど)を設定。
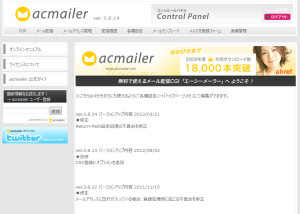
問題なく完了すると自動的にログインされた状態となる。
送信サーバー設定
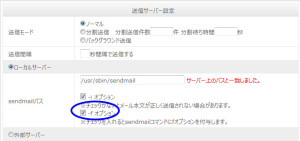
「sendmailパス」の「 -f オプション」にチェックを入れないと、不着メールのエラーメイルが指定されたアドレスに配信されない。
不着メール設定
acmailer では不着メール設定を有効にする事で不着メールの一覧の表示やカウントが可能。
不着メール用メールアドレス作成
acmailerの設置されているサーバ上に不着メール用メールアドレスを作成
この例では「error@mydomain.com」を作成。(画像では mydomain が webdesignleaves になっている)
acmailer の設定を有効にする
各種設定の「不着メール設定」の画面を開く。
- 不着メール管理
- 使用するにチェック
- 不着受信用メールアドレス
- 不着受信用に作成したメールアドレス( error@mydomain.com )を入力
- 配信停止設定
- 不着メールが届くメールアドレスを自動的に配信停止にする設定。
ゼロ(0)に設定した場合は自動的に配信停止にならない。
- 不着ログ保存件数
- 不着のログを保存する件数を指定
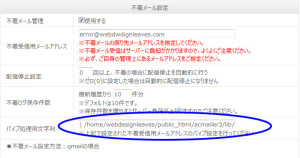
- パイプ処理用文字列
- サーバ側パイプ処理の設定に利用する(そのままにしておく)
以上の設定が完了したら「更新」ボタンをクリックし、設定を反映させる。
サーバ側パイプ処理の設定
不着メール用メールアドレスに対し「パイプ処理(プログラムへデータを渡す処理)」の設定を行う。
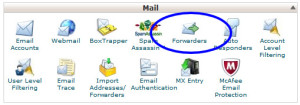
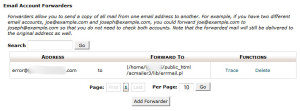
今回試した共用サーバー(inMotion)では、「.forward」の機能が使えないので cPanel の E-mail の「Forwarders」を利用して設定。
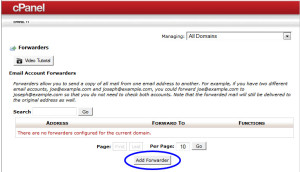
cPanel にログインして「E-mail」の「Forwarders」をクリック。以下の様な画面が表示されるので「Add Forwarder」をクリック。
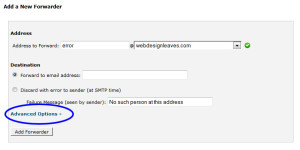
「Address to Forward:」に不着受信用に作成したメールアドレス( error@mydomain.com )を入力(ドメイン部分はプルダウン)
「Advanced Options」をクリック
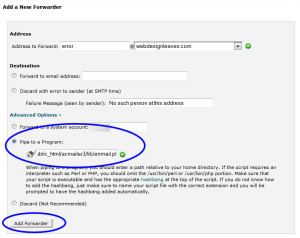
「 Pipe to a Program:」のラジオボタンにチェックを入れ、「パイプ処理用文字列」を入力。
「When piping to a program, you should enter a path relative to your home directory.」とあるが、以下のようにフルパスで OK だった。パスのみでパイプ(|)やクォーテーションは不要。パイプ(|)は自動的に補完された。
/home/mydomain/public_html/acmailer3/lib/errmail.pl
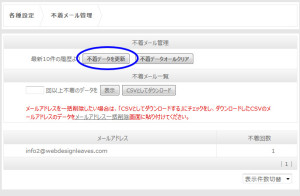
テスト用に「メール配信」で届かないメールを送信しておいて、「不着メール管理」で「不着データを更新」をクリックして「不着メール一覧」の「表示」をクリックすると、不着メールが表示される。
フォーム設定
- 上部メニューの「メルマガ登録フォーム」をクリック
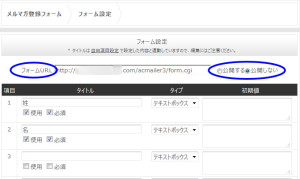
- フォームのページを使用する場合は「公開する」にチェックを入れる
- フォームのページを表示するにはページ下部の「フォームをプレビュー」をクリック
- フォームのページの URL は「フォーム URL」に表示されている
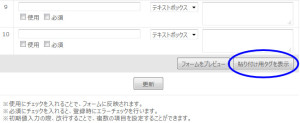
- フォームのページを使用しない場合は、【貼り付け用タグを表示】をクリックし、表示されたフォームタグをサイトの任意の場所へ挿入する(「公開しない」にチェックを入れる)
- タイトル
- 項目のタイトル。「自由項目設定」の内容と連動しているので、変更すると「自由項目設定」の内容も変更される
- 使用
- フォーム登録機能で使用したい項目はチェックを入れる
- 必須
- 必須にチェックを入れると、その項目に記述がなかった場合は登録エラーになる。(自由項目設定の内容と連動)
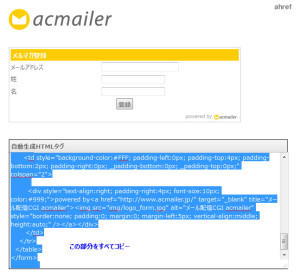
フォームのページを使用しない場合(フォームタグの挿入)
タイトルを入力し「使用」「必須」にチェックを入れ、ページ下部の「貼り付け用タグを表示」をクリック
- 以下の様に、フォームとそのタグが表示されるので、「自動生成HTMLタグ」のコードをすべてコピーして、サイトの適当な位置に挿入する。
- デザインの変更は可能だが、【広告非表示ライセンス】(有料)を取得していない場合は HTML タグ内の acmailer へのリンクを削除してはならない。
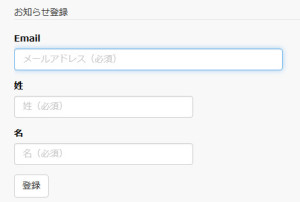
フォームタグの例(table, style を削除してスタイルは CSS で指定)
<form action="http://mydomain.com/acmailer3/reg.cgi" method="post" name="form2">
<legend class="contact_form">お知らせ登録</legend>
<div class="form-group">
  <label for="email">Email</label>
  <input type="text" name="email" value="" placeholder="メールアドレス(必須)" class="form-control input_email" >
</div>
<div class="form-group">
  <label for="col1">姓</label>
  <input type="text" name="col1" value="" placeholder="姓(必須)" class="form-control input_name">
</div>
<div class="form-group">
  <label for="col2">名</label>
  <input type="text" name="col2" value="" placeholder="名(必須)" class="form-control input_name">
</div>
<input type="hidden" name="reg" value="add">
    <input type="submit" value="登録" class="btn btn-default">
    <input type="hidden" name="encode" value="文字コード">
    <input type="hidden" name="checkbox_list" value="">
<div class="acmailer" >powered by<a href="http://www.acmailer.jp/" target="_blank" title="メール配信CGI acmailer"><img src="../../images/logo_form.jpg" alt="メール配信CGI acmailer" /></a></div>
</form>
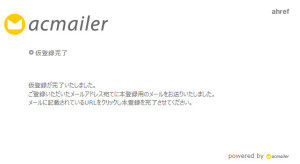
上記フォームを使って登録した場合の「仮登録完了」画面。
デザインのカスタマイズ
前述のデフォルトの「仮登録完了」画面では「acmailer 」のロゴなどが大きく表示されているが、これらは「acmailer3/tmpl」にあるファイルを編集すれば変更可能。但し、無料で使用している場合は「著作権表示箇所」を守らなければならない。
「貼り付け用タグ」の form 要素の action 属性(form action=”http://mydomain.com/acmailer3/reg.cgi” )から登録用のファイルは「reg.cgi」になっているようで、このファイルを見ると以下の様な箇所が見つかる。
if (&isMobile()) {
    # 携帯版
    &printhtml_tk($param, "tmpl/m_reg_finish.tmpl", "", "Shift_JIS");
  } else {
    # PC版
    &printhtml_tk($param, "tmpl/reg_finish.tmpl");
  }
例えば PC版 の「acmailer3/tmpl/reg_finish.tmpl」を見ると以下のようになっている。
[% INCLUDE 'tmpl/html_header_nomenu.tmpl' %]
        <div id="panel">
          <div id="panel_title">
              <p id="panel_title_1"></p>
                <p id="panel_title_2">登録完了</p>
            </div>
            <div id="panel_text">
[% email %]が追加されました。

            </div>
        </div>
[% INCLUDE 'tmpl/html_footer_nomenu.tmpl' %]
ヘッダー部分の「tmpl/html_header_nomenu.tmpl」とフッター部分の「tmpl/html_footer_nomenu.tmpl」から構成されているのでこれらのファイルを編集すれば見栄えを変更できる。但し、それぞれがテンプレートパートになっているので、注意しないとその変更が他のファイルにも影響する可能性があるので「著作権表示箇所」と合わせて慎重に。
html_header_nomenu.tmpl
<!DOCTYPE html PUBLIC "-//W3C//DTD XHTML 1.0 Transitional//EN" "http://www.w3.org/TR/xhtml1/DTD/xhtml1-transitional.dtd">
<html xmlns="http://www.w3.org/1999/xhtml">
<head>
<meta http-equiv="Content-Type" content="text/html; charset=[% sys.encode_type %]" />
<title>[% admindata.title|html %]</title>
<link rel="stylesheet" href="./css/common.css" type="text/css">
<link rel="stylesheet" href="./css/default.css" type="text/css">
<link rel="stylesheet" href="./css/login_etc.css" type="text/css">
</head>
<body>
<div id="containt_panel_wrapper">
<div id="containt_panel">
<div id="panel_head" class="clearfix">
<div id="panel_head_left">
[% UNLESS writing %]
<a href="http://www.acmailer.jp"><img src="img/logo.jpg" alt="メール配信CGI acmailer" /></a>
[% END %]
</div>
<div id="panel_head_right">[% UNLESS writing %]<a href="http://www.ahref.org"><img src="img/ahref_2.jpg" alt="WEBアプリケーション、フリーCGI配布のahref(エーエイチレフ)" /></a>[% END %]</div>
</div>
読み込んでいる CSS
- common.css : リセットCSS
- default.css : リンクカラーや共通 のスタイルなど
- login_etc.css : このページ特有のスタイル
html_footer_nomenu.tmpl
<div id="panel_foot">
[% UNLESS writing %]
powered by<a href="http://www.acmailer.jp/" target="_blank" title="メール配信CGI acmailer"><img src="./img/logo_form.jpg" alt="メール配信CGI acmailer" style="border:none; padding:0; margin:0; margin-left:5px; vertical-align:middle; height:auto;" /></a>
[% END %]</div>
    </div>
</div>
</body>
</html>
header に viewport の指定を追加して、login_etc.css の読み込みは止めて、インラインでスタイルを指定した例。(参考にはしないほうがいいと思います。)
html_header_nomenu.tmpl
<!DOCTYPE html PUBLIC "-//W3C//DTD XHTML 1.0 Transitional//EN" "http://www.w3.org/TR/xhtml1/DTD/xhtml1-transitional.dtd">
<html xmlns="http://www.w3.org/1999/xhtml">
<head>
<meta http-equiv="Content-Type" content="text/html; charset=[% sys.encode_type %]" />
<meta name="viewport" content="width=device-width">
<meta http-equiv="X-UA-Compatible" content="IE=edge,chrome=1" />
<title>[% admindata.title|html %]</title>
<link rel="stylesheet" href="./css/common.css" type="text/css">
<link rel="stylesheet" href="./css/default.css" type="text/css">
<!--<link rel="stylesheet" href="./css/login_etc.css" type="text/css"> -->
<style>
html{
background-color:#666666;
text-align:left;
width: 100%;
}
body{
margin-top:20px;
}
#containt_panel_wrapper{
max-width:680px;
min-width: 320px;
width:80%;
margin:0 auto;
background-color:#FFF;
}
#containt_panel{
width : 100%;
}
#panel{
width : 100%;
padding-top:2em;
text-align:left;
}
#panel_head{
width :100%;
padding: 0;
background-color: #222;
height: 100px;
width: 100%;
border: solid 2px color: #CCC;
}
#panel_head h1, #panel_head h2 {
text-align:center;
color: #B6ADED;
}
#panel_head h1 {
font-size: 20px;
padding-top: 20px;
}
#panel_head h2 {
font-size: 16px;
padding-top: 5px;
}
#panel_head h1 a, #panel_head h2 a {
color: #B6ADED;
}
#panel_head h1 a:hover, #panel_head h2 a:hover {
color: #A9E8F0;
text-decoration: none;
}
#panel_text, #panel_title_1, #panel_title_2 {
margin: 20px;
}
#submit_btn{
text-align:right;
}
#submit_btn input{
padding:0px 30px;
_padding:0px 20px;
}
#re_pass{
padding-top:10px;
padding-left:5px;
font-size:11px;
}
a {
color:#666;
text-decoration:none;
}
a:visited {
color:#666;
}
a:hover {
color:#CCC;
text-decoration:underline;
}
.red{
color:#C00;
background-image:url(../img/error.jpg);
background-repeat:no-repeat;
background-position:left center;
padding-left:20px;
font-size:15px;
}
#panel_foot{
width : 100%;
margin-top:95px;
text-align:right;
}
</style>
</head>
<body>
<div id="containt_panel_wrapper">
<div id="containt_panel">
<div id="panel_head">
<h1><a href="http://xxxxxx.com/contact1.php">お知らせ登録フォーム</a></h1>
<h2><a href="http://xxxxxx..com/index.html">(トップページへ)</a> </h2>
</div>
その他の設定(リンク)
以下はオンラインマニュアルへのリンク
