 WordPress ショートコードの作成
WordPress では記事に直接 PHP を記述することはできませんが、ショートコードを使うとあらかじめ設定しておいた PHP のコード(関数など)を呼び出すことができます。
WordPress で独自のショートコードを作成する方法やショートコードを使って Youtube の動画や Googlemap を表示する方法についての覚え書きです。
ショートコードに関する参考ページ
- ショートコード(日本語 Codex)
- ショートコード API(日本語 Codex)
- Codex/Shortcode
- Codex/Shortcode API
- Plugin Handbook/Shortcodes
更新日:2024年02月21日
作成日:2019年06月12日
概要
xxxx と言う名前のショートコード(shortcode)を functions.php に作成しておくと、投稿記事に [xxxx] のような短いコード(ショートコードタグ)を記述することで作成したコードの内容を呼び出すことができます。
ショートコードを作成するには、ショーコードタグで呼び出したい PHP のコード(コールバック関数)を functions.php に定義して、add_shortcode() を使って登録します。
例えば functions.php に以下のような hello と言う名前の独自のショートコードを記述します。
//hello と言う名前のショートコードの作成(functions.php)
function hello_callback() {
  return '<p>Hello, my friend!</p>';
}
add_shortcode('hello', 'hello_callback');
投稿に記述するショートコードタグは [xxxx] のようにショートコードの名前を角括弧(ブラケット)で囲みます。
上記のように hello と言う名前のショートコードを作成すると、投稿記事で [hello] と記述すれば以下が出力されます。
※最初の角括弧とショートコード名の間にスペースが入っているとショートコードとして認識されません。
<p>Hello, my friend!</p>
ショートコードを作成する書式
以下はショートコードを作成する書式の例です。
ショートコードの動作をコールバック関数で定義し、add_shortcode() を使ってそのコールバック関数とショートコード名を登録します。
function コールバック関数(引数) {
  /* ショートコードの処理(動作)の記述
     echo ではなく return を使用して値を返す */
  return $value;
}
add_shortcode('ショートコード名', 'コールバック関数名');
投稿記事では [ショートコード名] と記述することで定義したコードを呼び出すことができます。
また、必要に応じてショートコードのタグには属性を指定することができ、それらをコールバック関数のパラメータ $atts として受け取ることができます。
[ショートコード名 属性=値]
function callback_function($atts, $content = null, $tag ) {
  extract(shortcode_atts(array(
    //属性
    'パラメータ1' => 'デフォルトの値1',
    'パラメータ2' => 'デフォルトの値2',
    ・・・
  ), $atts));
  //ショートコードの処理(動作)の記述
  return $value;
}
add_shortcode('my_shortcode', 'callback_function');
add_shortcode
ショートコードを登録します(ショートコードタグ用のフックを追加します)。
add_shortcode( $tag , $func )
- パラメータ
-
- $tag (文字列):(必須)ショートコード名(投稿の本文から検索するショートコードの名前)
- $func(関数名):(必須) ショートコードが見つかったときに実行するコールバック関数
- 戻り値
- なし
以下は add_shortcode() のソースです。
function add_shortcode( $tag, $callback ) {
  global $shortcode_tags;

  if ( '' == trim( $tag ) ) {
    $message = __( 'Invalid shortcode name: Empty name given.' );
    _doing_it_wrong( __FUNCTION__, $message, '4.4.0' );
    return;
  }

  if ( 0 !== preg_match( '@[<>&/\[\]\x00-\x20=]@', $tag ) ) {
    /* translators: 1: shortcode name, 2: space separated list of reserved characters */
    $message = sprintf( __( 'Invalid shortcode name: %1$s. Do not use spaces or reserved characters: %2$s' ), $tag, '& / < > [ ] =' );
    _doing_it_wrong( __FUNCTION__, $message, '4.4.0' );
    return;
  }

  $shortcode_tags[ $tag ] = $callback;
}
問題なくショートコードが登録されると、グローバル変数 $shortcode_tags にショートコードが追加されます。
以下はグローバル変数 $shortcode_tags の中身を var_dump($shortcode_tags) で確認した例です。
array(8) {
  ["wp_caption"]=>string(21) "img_caption_shortcode"
  ["caption"]=>string(21) "img_caption_shortcode"
  ["gallery"]=>string(17) "gallery_shortcode"
  ["playlist"]=>string(21) "wp_playlist_shortcode"
  ["audio"]=>string(18) "wp_audio_shortcode"
  ["video"]=>string(18) "wp_video_shortcode"
  ["embed"]=>string(14) "__return_false"
  ["hello"]=>string(14) "hello_callback" //独自に追加したもの
}
以下は WordPress に標準で用意されているショートコードです。
- [caption] [wp_caption] :キャプション用のショートコード
- [gallery] :画像ギャラリーを表示するショートコード
- [playlist] :オーディオやビデオのプレイリストを表示するショートコード
- [audio] :オーディオファイルを埋め込む(再生する)ショートコード
- [video] :ビデオファイルを埋め込む(再生する)ショートコード
- [embed] :埋め込み要素用のショートコード
ショートコードの名前
ショートコード名には以下の文字を使用することができます。
- 英小文字
- 数字
- 下線(アンダーバー)
※ ハイフン(ダッシュ)は特別な使われ方をするので注意が必要です(使わないほうが無難です)。
ショートコードの名前はコールバック関数のパラメータ($tag)で参照することができます。
使えない文字
以下の文字はショートコードの名前には使用できません。
- 角括弧: [ ]
- 山括弧: < >
- アンパサンド: &
- スラッシュ: /
- 空白: スペース 改行(ラインフィード) タブ
- 印刷できない文字: \x00 - \x20
- クォート: ' "(使わないほうが良い)
ショートコードのソースを確認すると、これらの文字がショートコード名に含まれている場合はメッセージが表示され終了するようになっています。
コールバック関数のパラメータ
ショートコードのコールバック関数には以下の3つのパラメータが渡されます。
パラメータは全てオプションで省略可能ですが、使用する場合は記述する順番に依存します。
| パラメータ | 概要 |
|---|---|
| $atts | 属性の連想配列 |
| $content | ショートコードタグに囲まれたコンテンツ(囲み型ショートコードとして使われた場合) |
| $tag | ショートコードのタグ(ショートコード名) |
$atts
1番目のパラメータ $atts はショートコードタグに指定した属性の連想配列を受け取ります。
例えば、myshortcode と言う名前のショートコードを作成して、投稿に以下のように属性を指定した場合、
[myshortcode foo="apple" bar="orange"]
属性は以下のような連想配列に変換されて $atts パラメータとしてコールバック関数へ渡されます。
array( 'foo' => 'apple', 'bar' => 'orange' )
通常 $atts を使う場合は shortcode_atts() とPHP の extract() を使います。
shortcode_atts() の第1パラメータにはそのショートコードで使用する全ての属性名とそのデフォルト値を指定した連想配列を指定します。
第2パラメータにはコールバック関数に渡されたユーザーの属性の配列($atts)を指定します。
shortcode_atts( $defaults_array, $atts );
以下のように extract() を使うことで、属性の配列を変数として扱うことができます。
以下の場合、6行目の変数 $greet にはユーザーが指定した値があればその値が、ユーザーが指定した値がなければ Hello がセットされています。
function greeting_callback($atts) {
  extract(shortcode_atts(array(
    'greet' => 'Hello',
    'who' => 'my friend',
  ), $atts));
  $output = '<p>'. $greet . ', ' . $who . '!</p>';
  return $output;
}
add_shortcode('greeting', 'greeting_callback');
上記の場合、投稿に [greeting greet="Good Morning"] と記述すると以下のように出力されます。
属性 greet は"Good Morning"で上書きされ、属性 who は指定されていないのでデフォルトの'my friend'が適用されます。
<p>Good Morning, my friend!</p>
属性の値
属性の値にはシングルクォートとダブルクォートのどちらも使えます。
また属性の値が空白を含まない場合はクォートを省略することができます。
以下は同じことになります。
[myshortcode foo='123' bar=456]
[myshortcode foo="123" bar="456"]
- ショートコード名と属性の間及び属性と属性の間は半角スペースで区切ります。
- 属性の値には角括弧やクォートを含むことはできません。
真偽値の判定
真偽値を値に指定しても文字列として解釈されるため true になります。
以下のようなショートコードを作成して、属性 bool に値を指定して false と判定されるのは、空文字や 0 を指定する場合になります。
function my_boolean_callback($atts) {
  extract(shortcode_atts(array(
    'bool' => true,
  ), $atts));
  if($bool) {
    return '<p>True</p>';
  }else{
    return '<p>False</p>';
  }
}
add_shortcode('my_boolean', 'my_boolean_callback');
以下の場合に false となります。
[my_boolean bool='']
[my_boolean bool=""]
[my_boolean bool=0]
[my_boolean bool='0']
[my_boolean bool="0"]
true や false を指定した場合に真偽値として判定するには、文字列として判定する方法があります。
以下は属性 bool に false や False、FALSE などを指定した場合のみ false(偽)と判定する例です。
strtolower($bool) で属性 bool に指定された文字列を小文字に変換して、その値が false と一致する場合のみ false と判定しています。
function my_boolean_callback($atts) {
  extract(shortcode_atts(array(
    'bool' => true,
  ), $atts));

  $output = '<p>True</p>';

  //$bool を真偽値に変換
  if('false' === strtolower($bool)) {
    $bool = false;
  }else{
    $bool = true; //それ以外の場合は true
  }

  if(!$bool) { //false の場合の処理
    $output ='<p>False</p>';
  }

  return $output;
}
add_shortcode('my_boolean', 'my_boolean_callback');
以下のようにすると、小文字に変換して false となる文字列及び空文字や 0 を指定した場合に false(偽)と判定します。
function my_boolean_callback($atts) {
  extract(shortcode_atts(array(
    'bool' => true,
  ), $atts));

  $output = '<p>True</p>';

  if('false' === strtolower($bool)) {
    $bool = false;
  }

  if(!$bool) { //false の場合の処理
    $output ='<p>False</p>';
  }

  return $output;
}
add_shortcode('my_boolean', 'my_boolean_callback');
$content
[myshortcode]コンテンツ[/myshortcode] のような囲み型ショートコードの場合、コールバック関数は第2引数 $content にそのコンテンツを受け取ることができます。
通常、第2パラメータの $content には以下のようにデフォルト値を与えておきます。
function my_shortcode_handler( $atts, $content = null )
$content はエスケープやエンコードされずに返り値へ含められるので、 HTML の出力を許可しないようにするにはエスケープ処理などを行う必要があります。
以下はコンテンツをエスケープ処理して p 要素で囲んで出力する例です。
function my_content_callback($atts, $content = null) {
  return '<p>'. esc_html($content) .'</p>';
}
add_shortcode('my_content', 'my_content_callback');
[my_content]<a href="example.com">Test</a>[/my_content] のように記述すると以下のように出力されます。
<p><a href=”example.com”>Test</a></p>
$tag
第3パラメータの $tag にはショートコード名が渡されます。
function my_content_callback($atts, $content = null, $tag) {
  return '<p class="'. esc_attr($tag). '">Shortcode Name: '. esc_html($tag) .'</p>';
}
add_shortcode('my_content', 'my_content_callback');
上記の場合、[my_content] と記述すると以下のように出力されます。
<p class="my_content">Shortcode Name: my_content</p>
shortcode_atts
ショートコードで使用する全ての属性のデフォルト値とユーザーが指定した属性を結合して返します。
ユーザーの指定した属性($atts)を第2パラメータに指定することでユーザーの指定した属性にはその値がセットされ、ユーザーが指定していない属性にはデフォルト値がセットされます。
ユーザーがサポートされていない属性を指定した場合は、それらの属性は無視されます。
shortcode_atts( $pairs , $atts, $shortcode )
- パラメータ
-
- $pairs(配列):(必須) 使用する全ての属性の名前とデフォルト値を連想配列で指定
- $atts(配列):(必須) ユーザーがショートコードタグに指定した属性(連想配列)。コールバック関数内では $atts として受け取ります。
- $shortcode(文字列):(オプション) shortcode_atts_{$shortcode} フィルターに使われるショートコード名。これを指定すると、他のコードが属性をフィルターするために shortcode_atts_{$shortcode} フィルターを使用できます。
- 戻り値
- ユーザーの指定した属性値とデフォルト値を結合し shortcode_atts_{$shortcode} フィルターを適用した属性のリスト(連想配列)
以下は2つの連想配列($params と $atts)を shortcode_atts() で結合して結果を var_dump() で出力する例です。
<?php
$params = array (
  'class' => 'foo',
  'id' => 'bar',
  'alt' => '',
  'width' => '100px'
);

$atts = array (
  'class' => 'my_class',
  'alt' => 'my_alt',
  'height' => '20px'
);

$result =shortcode_atts($params, $atts);
var_dump($result);
?>
結合した結果は以下のようになります。
第1パラメータ($params)に存在しない値を第2パラメータ($atts)で指定しても無視され、返されるリストには含まれません(上記の例では height)。
array(4) {
  ["class"]=>
  string(8) "my_class" //ユーザーの値で上書き
  ["id"]=>
  string(3) "bar" //ユーザーが指定していない場合はデフォルト値
  ["alt"]=>
  string(6) "my_alt" //ユーザーの値で上書き
  ["width"]=>
  string(5) "100px" //ユーザーが指定していない場合はデフォルト値
}
PHP の extract() を使うと連想配列を変数に登録(抽出)してくれるので、キーの名前を変数名として利用できます。
<?php
$params = array (
  'class' => 'foo',
  'id' => 'bar',
  'alt' => '',
  'width' => '100px'
);

$atts = array (
  'class' => 'my_class',
  'alt' => 'my_alt',
  'height' => '20px'
);

$result =shortcode_atts($params, $atts);

//まだ変数として登録されていないため Notice: Undefined variable が発生する
//echo $class;

//連想配列を変数に登録
$result = extract($result);

//extract() により以下の変数が登録されたので利用できる
echo $class; //my_class
echo $id;  //bar
echo $alt;  //my_alt
echo $width;  //100px

//shortcode_atts() で無視されるため Notice: Undefined variable が発生する
//echo $height;

var_dump($result);  //int(4) シンボルテーブルにインポートした変数の数
?>
以下は shortcode_atts() のソースです。
ユーザーの指定した属性($atts)とデフォルト値を結合して shortcode_atts_{$shortcode} を適用した値を返しています。
function shortcode_atts( $pairs, $atts, $shortcode = '' ) {
  $atts = (array) $atts;
  $out  = array();
  foreach ( $pairs as $name => $default ) {
    if ( array_key_exists( $name, $atts ) ) { //ユーザーの指定した属性が存在すれば
      $out[ $name ] = $atts[ $name ];
    } else { //ユーザーの指定した属性が存在しなければ
      $out[ $name ] = $default;
    }
  }
  /**
   * Filters a shortcode's default attributes.
   * If the third parameter of the shortcode_atts() function is present then this filter is available.
   * The third parameter, $shortcode, is the name of the shortcode.
   * @since 3.6.0
   * @since 4.4.0 Added the `$shortcode` parameter.
   * @param array  $out       The output array of shortcode attributes.
   * @param array  $pairs     The supported attributes and their defaults.
   * @param array  $atts      The user defined shortcode attributes.
   * @param string $shortcode The shortcode name.
   */
  if ( $shortcode ) {
    $out = apply_filters( "shortcode_atts_{$shortcode}", $out, $pairs, $atts, $shortcode );
  }

  return $out;
}
出力
ショートコードのコールバック関数(ハンドラー関数)の戻り値はショートコードタグの代わりに投稿コンテンツの出力へ挿入されます。言い換えると、ショートコードタグが記述された部分は、ショートコードのコールバック関数の戻り値に置き換えられます。
the_content() で投稿の本文を出力する際は、本文のショートコードタグの部分がコールバック関数で置き換えられて echo で出力されます。
そのため、ショートコードのコールバック関数では echo ではなく return を使って値を返します 。
以下は the_content() のソースです。
function the_content( $more_link_text = null, $strip_teaser = false ) {
  $content = get_the_content( $more_link_text, $strip_teaser );
  $content = apply_filters( 'the_content', $content );
  $content = str_replace( ']]>', ']]>', $content );
  echo $content;
}
本文($content)は the_content フィルタの適用(3行目)後に echo されています。この the_content フィルタに do_shortcode() がフックされていてショートコードが実行されています。
the_content フィルタ
WordPress コアの wp-includes/default-filters.php には以下の記述があり、the_content フィルタに do_shortcode() を優先度(priority) 11 でフックしています。
// Shortcodes
add_filter( 'the_content', 'do_shortcode', 11 ); // AFTER wpautop()
本文のテキストを整形する wpautop や wptexturize は優先度(priority) 10 でフックされています。
このためデフォルトでは、the_content() で出力されるコンテンツに含まれるショートコードは wpautop や wptexturize による投稿の整形適用後に実行されます。
ショートコードのコールバック関数の戻り値は wpautop や wptexturize が適用されないので、p タグや br タグは追加されません(※1)。
ショートコードの出力を整形したい場合は、ショートコードのコールバック関数において wpautop() や wptexturize() を呼び出して適用する必要があります。
また wpautop はショートコードの構文を認識し、ショートコードだけが書かれた行を p あるいは br タグで括らないようにします(※2)。
※1 wpautop や wptexturize が適用されないのはコークバック関数で処理した値(自己完結型のショートコードの戻り値など)に対してになります。囲み方ショートコードで受け取るコンテンツ(第2パラメータ $content)に対しては wpautop や wptexturize が適用される可能性があります。
※2 囲み方ショートコードで受け取るコンテンツ(第2パラメータ $content)はこの限りではないようです。
the_content() で本文が出力される際の順序
- get_the_content() で投稿の本文を取得
- the_content フィルタで本文に wpautop や wptexturize を適用
- the_content フィルタで本文に記述されているショートコードを do_shortcode() で実行(変換)
- echo で本文を出力
関連項目:ショートコード表示の流れ
do_shortcode
ショートコードを実行(変換)します。
指定されたコンテンツにショートコードがあれば、そのショートコードのコールバック関数(ハンドラ)を実行してショートコードタグ部分をコールバック関数の実行結果に置き換えます。
echo do_shortcode( $content, $ignore_html )
- パラメータ
-
- $content(文字列):(必須) ショートコードを探す対象のコンテンツの文字列。
- $ignore_html(真偽値):(オプション)true を指定すると HTML 要素内のショートコードを対象外とします。初期値:false
- 戻り値
- ショートコード変換後の文字列(ショートコードのコールバック関数の返す文字列)。
PHP ファイルの中(テーマのテンプレート)でショートコードを使う場合は以下のように echo を使って出力します。
<?php echo do_shortcode( '[my_shortcode]' ); ?>
囲み型ショートコードの場合は以下のようにします。
<?php echo do_shortcode( '[my_shortcode]文字列[/my_shortcode]' ); ?>
または
<?php
  $my_content = "文字列";
  echo do_shortcode('[my_shortcode]' .$my_content. '[/my_shortcode]');
?>
テキストウィジェットの中でショートコードを使えるようにするには以下を functions.php に記述します。
add_filter( 'widget_text', 'do_shortcode' );
属性に変数を指定
属性の値にはクォートを含むことはできないので、変数を指定する場合はバックスラッシュでダブルクォートをエスケープする必要があります。
以下は属性の値を出力するだけのショートコードを作成した場合の例です。
function my_shortcode_callback($atts) {
  extract(shortcode_atts(array(
    'foo' => 'FOO',
    'bar' => 'BAR',
  ), $atts));
  $output = '<p>foo: '. $foo . ', bar: ' . $bar . '</p>';
  return $output;
}
add_shortcode('my_shortcode', 'my_shortcode_callback');
do_shortcode() で出力する際に属性に変数を渡すには、ショートコード [ ] をダブルクォートで囲み、変数を指定する際に変数を囲むダブルクォートをエスケープする必要があります。
以下は配列 $my_array の要素の2つをランダムに表示する例です。
<?php
$my_array = array('apple', 'banana', 'strawberry', 'melon', 'grape');
$my_random = range( 0, count($my_array) - 1);  //0〜4 の整数の配列を生成
shuffle($my_random);  //ランダムに配列の要素を並べ替え
$foo = $my_array[$my_random[0]];
$bar = $my_array[$my_random[1]];
echo do_shortcode( "[my_shortcode foo=\"$foo\" bar=\"$bar\"]" );
?>
以下のようにショートコード [ ] をシングルクォートで囲んで指定すると期待通りになりません。
<?php
echo do_shortcode( '[my_shortcode foo=\"$foo\" bar=\"$bar\"]' );
//foo: FOO, bar: BAR のように表示され期待通りになりません

echo do_shortcode( '[my_shortcode foo="$foo" bar="$bar"]' );
//foo: $foo, bar: $bar のように表示され期待通りになりません
ショートコード表示の流れ
do_shortcode() は the_content() を使って投稿記事を表示する際に自動的に実行されます。
以下は投稿本文に記述されているショートコードが表示される流れです。
do_shortcode は wp-includes/default-filters.php で the_content フィルタにフックされています。
//default-filters.php
add_filter( 'the_content', 'do_shortcode', 11 );
投稿の本文を出力する the_content() は、本文を出力する前に、コンテンツ($content)に the_content フィルタを適用します。
//the_content() の定義から抜粋
$content = apply_filters( 'the_content', $content );
このフィルタの適用により the_content フィルタに登録されているショートコードや wpautop、 wptexturize などが実行されます。
この際ショートコードの優先度は11なので優先度10の wpautop や wptexturize の後に実行されます。
ショートコードの実行によりショートコードタグの部分がショートコードのコールバック関数の実行結果に変換されます。
//ショートコードの実行
do_shortcode( $content );
その後 the_content() によりショートコードが変換された $content が echo され本文が表示されます。
以下は do_shortcode() のソースです。
$content 中の左側角括弧やショートコードタグが格納されいているグローバル変数 $shortcode_tags を調べてショートコードがあれば do_shortcodes_in_html_tags() や do_shortcode_tag() でショートコードを実行して処理結果を返しています。
function do_shortcode( $content, $ignore_html = false ) {
  global $shortcode_tags;

  if ( false === strpos( $content, '[' ) ) {
    return $content;
  }

  if ( empty( $shortcode_tags ) || ! is_array( $shortcode_tags ) ) {
    return $content;
  }

  // Find all registered tag names in $content.
  preg_match_all( '@\[([^<>&/\[\]\x00-\x20=]++)@', $content, $matches );
  $tagnames = array_intersect( array_keys( $shortcode_tags ), $matches[1] );

  if ( empty( $tagnames ) ) {
    return $content;
  }

  $content = do_shortcodes_in_html_tags( $content, $ignore_html, $tagnames );

  $pattern = get_shortcode_regex( $tagnames );
  $content = preg_replace_callback( "/$pattern/", 'do_shortcode_tag', $content );

  // Always restore square braces so we don't break things like <!--[if IE ]>
  $content = unescape_invalid_shortcodes( $content );

  return $content;
}
自己完結型と囲み型
ショートコードには「自己完結型ショートコード」と「囲み型ショートコード」があります。
自己完結型ショートコード
コンテンツを受け取る必要がないショートコードの場合は [myshortcode] のように記述することでコールバック関数で設定したコード(動作)を呼び出すことができます。
このようにショートコードのタグを1つ記述するだけで成立するショートコードを「自己完結型ショートコード」と呼びます。
以下を functions.php に以下を記述して、投稿記事で [my_sc] と記述すれば get_bloginfo('description') によりサイトのキャッチフレーズが出力されます。
function my_sc_cb() {
  return esc_html(get_bloginfo('description'));
}
add_shortcode('my_sc', 'my_sc_cb');
必要に応じてショートコードに属性を設定して利用することができます。
属性は[ショートコード名 属性=値] のように記述すると、コールバック関数のパラメータ $atts で受け取ることができます。
以下の場合、投稿記事で [my_sc pre="Title: "] と記述すれば「Title: サイトのキャッチフレーズ」が出力されます。
function my_sc_cb($atts) {
  extract(shortcode_atts(array(
    'pre' => '',
  ), $atts));

  return esc_html($pre . get_bloginfo('description'));
}
add_shortcode('my_sc', 'my_sc_cb');
自己完結型ショートコードの場合、角括弧(ブラケット)の最後に /(スラッシュ)を付けて [my_sc/] やスラッシュの前に半角スペースを1つ入れて [my_sc /] のように記述することもできますが、機能的には変わりません。
囲み型ショートコード
[myshortcode]コンテンツ[/myshortcode] のようにコンテンツを囲んでその値を利用するショートコードを「囲み型ショートコード」と呼びます。
例えば以下のようなショートコードを作成して、投稿記事で [hello2]Universe[/hello2] と記述すれば
<p>Hello, Universe!</p> と出力されます。
function hello_callback2($atts, $content = null ) {
  $output = '<p>Hello, World!</p>';
  if($content) {
    $output = '<p>Hello, ' .esc_html($content) . '!</p>';
  }
  return $output;
}
add_shortcode('hello2', 'hello_callback2');
上記の場合、もしユーザーが[hello2][/hello2] と記述したり [hello2] のみを記述した場合は
<p>Hello, World!</p> と出力されます。
ユーザーはショートコードを自己完結型または囲み型のどちらでも記述できるようになっているため、コールバック関数の第2パラメータに「$content = null」としてデフォルト値を与えておき、どちらのケースにも対応できるようにします。
エスケープ処理
第2パラメータで受け取る $content はエスケープやエンコードされずに戻り値へ含められ出力されるため、値のエスケープ処理などは必要に応じてコールバック関数で行う必要があります。
例えば以下のような囲み型ショートコードの場合、$content はエスケープ処理していないので HTML タグをショートコードで囲まれた部分($content)に記述すればそのまま出力されます。
function test_callback($atts, $content) {
  return sprintf(
  '<div>%s</div>'. "\n",
  $content //エスケープ処理せずにそのまま出力
  );
}
add_shortcode('test', 'test_callback');
以下のように編集画面に記述するとエスケープされずリンク(a 要素)が出力されます。
[test] <a href="#">test</a> [/test]
<div> <a href="#">test</a> </div>
$content に含まれる改行
ショートコードは wpautop や wptexturize による投稿の整形適用後に実行されるので p タグや br タグが追加されませんが、囲み型ショートコードで囲まれた部分は the_content フィルタの整形が適用されます。
囲み型ショートコードで囲まれた部分($content)に改行などがあれば、整形が適用されて p タグや br タグが追加され、シングルクォートはカーリークォートに変換されます。
例えば以下のような囲み型ショートコードの場合、ショートコードで囲まれた部分($content)に改行などがあると p タグや br タグが追加されて出力されます。
function test_callback($atts, $content) {
  return sprintf(
  '<div>%s</div>'. "\n",
  $content //エスケープ処理せずにそのまま出力
  );
}
add_shortcode('test', 'test_callback');
例えば以下のように入力すると、
[test] test
'test'

test [/test]
ビジュアルエディタ
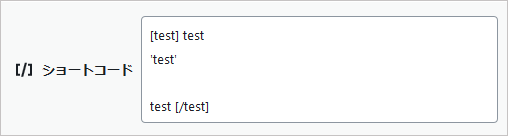
コードエディタ
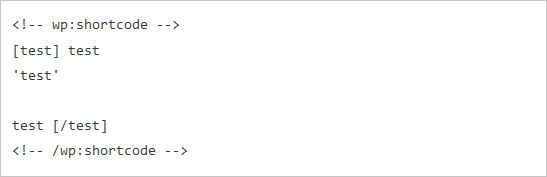
上記のように記述した場合、以下のように出力され、p タグや br タグが追加されシングルクォートはカーリークォートに変換されます。
<div> test<br>
‘test’<p></p>
<p>test </p></div>
pre タグ
pre タグで囲まれた部分に関しては wpautop や wptexturize の適用の対象外になります。
前述の [test]~[/test] で以下のように pre タグを使うとその部分は整形が適用されないため p タグや br タグは追加されず、シングルクォートはカーリークォートに変換されません。
<pre>[test]test
'test'

test[/test]</pre>
以下が出力結果です。
<pre><div>test
'test'

test</div>
</pre>
以下のようにショートコード内に pre タグを記述した場合は異なります。
[test]<pre>test
'test'

test</pre>[/test]
以下のように前述の例とは異なり pre タグの前後に p 要素が追加されています。
<div><p></p>
<pre>test
'test'

test</pre>
<p></p></div>
- wptexturize は <pre>, <code>, <kbd>, <style>, <script>, <tt> タグに囲まれたテキストはスキップします。
- wpautop は <pre> タグに囲まれた部分を対象にしません。
ショートコードの入れ子
囲み型ショートコードの中に更に別のショートコードを記述した場合、ショートコードは内側のショートコードを変換しません。
ショートコードはコンテンツに対して一度しか実行されないため、引数に渡されたコンテンツ($content)の中に更にショートコードがあっても実行されません。
例えば以下のようなショートコードがある場合、
//コンテンツを p 要素で囲んで出力するショートコード
function my_content_callback($atts, $content = null) {
  return '<p>'. esc_html($content) .'</p>';
}
add_shortcode('my_content', 'my_content_callback');

//サイトのタイトルを出力するショートコード
function my_site_title_cb() {
  return esc_html(get_bloginfo('name'));
}
add_shortcode('my_site_title', 'my_site_title_cb');
投稿に以下のようにショートコードを入れ子にして記述すると
[my_content] サイトのタイトル: [my_site_title] [/my_content]
出力は以下のようになり、内側のショートコードは実行されません。
<p> サイトのタイトル: [my_site_title] </p>
外側のショートコードのコールバック関数の中で、do_shortcode() を呼び出すことでショートコードを再帰的に実行することができます。
但し、再帰的と言っても同じ名前のショートコードを入れ子にすることはできません。
上記の例の場合、外側のショートコードを以下のようにすれば内側のショートコードも実行されるようになります。
function my_content_callback($atts, $content = null) {
  //do_shortcode($content) でショートコードを再帰的に実行
  return '<p>'. esc_html( do_shortcode($content) ) .'</p>';
}
add_shortcode('my_content', 'my_content_callback');
入れ子の制限事項
同じ名前のショートコードを入れ子にすると、うまく解析されず期待通りの動作になりません。
同じ名前が問題なので同じ関数に異なる名前を付ければ実行することは可能です。
以下はユーザーの入力した文字列を属性で指定した要素で出力するショートコード(内容は全く同じで名前が異なる)を入れ子にする例です(あまり良い例ではないと思いますが)。
function my_content_callback2($atts, $content = null) {
  extract(shortcode_atts(array(
    'elem' => 'p',
  ), $atts));
  $output = '';
  if(!empty($content)) {
    $output = sprintf(
      '<%s>%s</%s>', //出力するフォーマット文字列
      esc_html($elem), //属性の elem に指定された値
      do_shortcode($content) , //ショートコードタグで囲まれた文字列
      esc_html($elem) //属性の elem に指定された値
    );
  }
  return $output ;
}
add_shortcode('my_content2', 'my_content_callback2');

function my_content_callback3($atts, $content = null) {
  extract(shortcode_atts(array(
    'elem' => 'p',
  ), $atts));
  $output = '';
  if(!empty($content)) {
    $output = sprintf(
      '<%s>%s</%s>', //出力するフォーマット文字列
      esc_html($elem), //属性の elem に指定された値
      do_shortcode($content) , //ショートコードタグで囲まれた文字列
      esc_html($elem) //属性の elem に指定された値
    );
  }
  return $output ;
}
add_shortcode('my_content3', 'my_content_callback3');
以下を投稿に記述すると、
[my_content2 elem='p'] パラグラフ [my_content3 elem='span' ] スパン [/my_content3] パラグラフ [/my_content2]
以下のように出力されます。
<p> パラグラフ <span> スパン </span> パラグラフ </p>
上記の例は入れ子を実行できるようにするために do_shortcode($content) を実行していますが、エスケープ処理を行うことができません(内側の要素がエスケープされてしまうため。入力する値を制限すれば良いかもしれません)。
その他の入れ子に関する制限事項やショートコードに関する制限事項は以下に記載されています。
ショートコードのサンプル
関連ページ:
以下はショートコードを利用したサンプルです。
Youtube を表示
Youtube 動画をショートコードを使って表示する方法です。
iframe で出力された Youtube 動画をレスポンシブ対応で表示するには以下のような HTML を記述してスタイルを指定します。
div 要素に指定されているクラス名は任意ですが、変更する場合はスタイル側も変更します。
3行目の VIDEO_ID の部分に表示する動画の ID を指定します(動画のページの「共有」をクリックして表示される URL の最後の部分 例:https://youtu.be/dH3GSrCmzC8 の場合は dH3GSrCmzC8)
<div class="yt_wrapper">
  <div class="youtube">
    <iframe width="640" height="360" src="//www.youtube.com/embed/VIDEO_ID" frameborder="0" allowfullscreen></iframe>
  </div><!--end of .youtube-->
</div><!--end of .yt_wrapper-->
以下のようなスタイルを style.css に記述してレスポンシブに表示できるようにします。動画のサイズなどは max-width などで適宜変更します。
以下は 16:9 の比率(9 ÷ 6 = 56.25)で表示する例です。4:3 の比率で表示するには10行目を padding-bottom: 75%; にします(3 ÷ 4 = 75)。
.yt_wrapper {
  max-width: 640px; /* 動画の幅の最大サイズ */
  min-width: 280px;
  margin: 20px auto;
  border: 1px solid #CCC;
}

.youtube {
    position: relative; /* 子要素の基準とする */
    padding-bottom: 56.25%; /* 幅の 56.25% を高さとする (16:9) */
    padding-top: 25px; /* クロム用の高さを指定 */
    height: 0; /* 古い IE のレイアウト用 */
    overflow: hidden;
}

.youtube iframe {
    position: absolute; /* 親要素のパディング領域に配置するために、絶対配置を指定 */
    top: 0;
    left: 0;
    width: 100%; /* 親コンテナの幅いっぱいに表示 */
    height: 100%; /* 親コンテナの高さいっぱいに表示 */
}
以下を functions.php に記述して youtube と言うショートコードを作成します。Youtube を表示する HTML に sprintf() を使ってオプションを指定しています。
属性の vid で再生する動画の VIDEO_ID を指定します(必須)。指定しないと「Youtube のソースが指定されていません。」と言うメッセージが表示されます。間違った VIDEO_ID を指定すると動画が表示されません。
属性の rel は再生が終了したときに、プレーヤーに関連動画を表示するかどうかの指定で、デフォルトは 0 で関連動画を表示しません。関連動画を表示するには rel='1' を指定します。
function youtube_callback($atts) {
  extract(shortcode_atts(array(
    'vid' => '',  //VIDEO_ID(動画の ID)必須
    'rel' => '0',  //デフォルトは関連動画を表示しない
    ), $atts));
  $output = '';
  if($vid){
    $output = sprintf(
      '<div class="yt_wrapper">'. "\n" .
      '<div class="youtube">'. "\n" .
      '<iframe width="640" height="360" src="https://www.youtube.com/embed/%s%s" frameborder="0" allowfullscreen></iframe>'."\n" .
      "</div>\n</div>",
      $vid,
      ($rel == '0' ) ? '?rel=0': ''
    );
  }else{
    $output = 'Youtube のソースが指定されていません。';
  }
  return $output;
}
add_shortcode('youtube', 'youtube_callback');
動画のID(VIDEO_ID)が dH3GSrCmzC8 の動画を再生終了時に関連動画を表示するには以下のように投稿に記述します。
[youtube vid='dH3GSrCmzC8' rel='1']
Youtube 関連ページ
Googlemap を表示
ショートコードを使って Googlemap を表示する方法について。
Googlemap を利用するには2018年7月16日から基本的に API キーを取得する必要があります。
詳細は以下をご覧ください。
iframe
以下は Googlemap を iframe を使って表示する方法です。この方法の場合は API キーは必要ありません。
但し、現在 Googlemap の使用には API キーを使うことが推奨されていて、いつまでこの方法で Googlemap を表示できるかは不明です。
現時点(2019年6月10日)では表示できていますが、突然表示できなくなる可能性があるのでご注意ください。
以下は iframe を使って Googlemap を表示する場合の HTML の例です。
<div class="map_wrapper">
  <div class="googlemap">
    <iframe src="https://maps.google.co.jp/maps?output=embed&t=m&hl=ja&z=15&ll=40.748441,-73.985664&q=40.748441,-73.985664" frameborder="0" scrolling="no" width="auto"></iframe>
  </div><!--end of .googlemap-->
</div><!--end of .map_wrapper-->
地図を埋め込むには iframe の src 属性で「maps?output=embed」を指定してその後に地図の種類(t)や言語(hl)、ズームレベル(z)、緯度・経度(ll)、ピンの位置(q)をパラメータで指定しています。
src="https://maps.google.co.jp/maps?output=embed&t=m&hl=ja&z=15&ll=40.748441,-73.985664&q=40.748441,-73.985664"
また地図をレスポンシブに表示するために以下のようなスタイルを指定します。
環境に合わせて .map_wrapper で最大幅やマージン、パディング、ボーダーの有無を指定します。
.map_wrapper { /* 地図全体のレイアウト用(オプション)*/
  max-width: 640px; /* 最大幅を指定 */
  min-width: 280px; /* 最小幅を指定 */
  margin: 20px auto; /* 上下マージンを20pxにして中央寄せ */
  padding: 4px; /* パディングを4px */
  border: 1px solid #CCC;   /* ボーダーを追加 */
}

.googlemap {
  position: relative; /* 子要素の基準とする */
  padding-bottom: 56.25%; /* 幅の 56.25% を高さとする場合(16:9)*/
  height: 0; /* 古い IE のレイアウト用 */
  overflow: hidden;
}
.googlemap iframe {
  position: absolute; /* 親要素(.googlemap)のパディング領域に配置 */
  top: 0;
  left: 0;
  width: 100%; /* 親コンテナの幅いっぱいに表示 */
  height: 100%; /* 親コンテナの高さいっぱいに表示 */
}
以下を functions.php に記述して googlemap と言うショートコードを作成します。Googlemap を表示する ifrma の HTML に sprintf() を使ってパラメータのオプションを指定しています。
属性の lat と lng で表示する地図の緯度と経度を指定します(必須)。指定しないと「位置情報(緯度/lat 経度/lng)が指定されていません。」と言うメッセージが表示され地図が表示されません。
属性の lat と lng にデフォルト値を設定しておけば、位置情報を指定しない場合はデフォルトの地図を表示することができます。
また、この場合デフォルトではズームレベルを14でピンを表示するようにしています。ピンを非表示にするには属性の pin に false を指定します。
function googlemap_callback($atts){
  extract(shortcode_atts(array(
    'zoom' => '14',  //ズームレベル
    'lat' => '',  //緯度(必須)
    'lng' => '',  //経度(必須)
    'pin' => 'true',  //ピンを表示するかどうか
    ), $atts));

  if('false' === strtolower($pin)) {
    //'pin' に false や False、空文字、0 が指定された場合は false(真偽値)に
    $pin = false;
  }
  if($pin) {
    $pin = '&q=' . $lat . ',' . $lng;
  }else{
    $pin = '';
  }

  $output = '';
  if($lat && $lng){
    $output = sprintf(
      '<div class="map_wrapper">'. "\n" .'<div class="googlemap">'. "\n" .
      '<iframe src="https://maps.google.co.jp/maps?output=embed&t=m&hl=ja&z=%s&ll=%s,%s%s" frameborder="0" scrolling="no" width="auto"></iframe>'."\n" .
       "</div>\n</div>",
      $zoom,
      $lat,
      $lng,
      $pin
      );
  }else{
     $output = '<p>位置情報(緯度/lat 経度/lng)が指定されていません。</p>';
  }
  return $output;
}
add_shortcode('googlemap', 'googlemap_callback');
以下は緯度と経度にエンパイアステートビルの位置を指定して、ズームレベルを10、ピンを非表示で Googlemap を表示するショートコードタグの例です。
[googlemap lat='40.748441' lng='-73.985664' zoom='10' pin='false']
Maps JavaScript API
Googlemap の JavaScript API を使って表示する方法です。
Maps JavaScript API を使って表示
以下は地図を表示する際の基本的な HTML の構造です。地図を表示する領域を親要素(div class="map_wrapper")で囲みます。
<div class="map_wrapper">
  <div id="gmap" class="gmap"></div>
</div>
また地図をレスポンシブに表示するために以下のようなスタイルを指定します。スタイルを直接ショートコードにインラインで記述することもできます。
.map_wrapper {
  position: relative;
  width:100%;
  padding-top:56.25%;
  border: 1px solid #CCC;
}

.map_wrapper .gmap {
  position: absolute;
  width: 100%;
  height: 100%;
  top: 0;
  left: 0;
}
以下は属性で API キーと緯度と経度を指定して地図を表示するショートコードの例です。
緯度と経度が指定されていれば、HTML を出力しヒアドキュメントで地図を表示する JavaScript を出力、最後に Googlemaps API の JavaScript(https://maps.googleapis.com/maps/api/js)を出力しています(実際には $output にまとめて出力しています)。
ヒアドキュメントの終了文字列の行(22行目)では EOF の前にスペース等があるとエラーになります。
地図を表示する方法については「Google Maps API の使い方・利用方法」をご覧ください。
function googlemap_callback($atts){
extract(shortcode_atts(array(
'api' => 'xxxxxxxxxx', //API キー
'zoom' => '14', //ズームレベル
'lat' => '', //緯度(必須)
'lng' => '', //経度(必須)
'id' =>'gmap' //地図を表示する領域の div 要素の id
), $atts));
if($lat && $lng){
$output = '<div class="map_wrapper"><div id="'.$id. '" class="gmap"></div></div>';
$output .= '<script>';
$output .= <<<EOF
var map;
function initMap() {
map = new google.maps.Map(document.getElementById('$id'), {
center: {lat: $lat, lng: $lng},
zoom: $zoom
});
}
</script>
EOF;
$output .= '<script src="https://maps.googleapis.com/maps/api/js?language=ja®ion=JP&key=' .$api. '&callback=initMap" async defer></script>';
}else{
$output = '<p>地図の位置情報(緯度/lat 経度/lng)が指定されていません。</p>';
}
return $output ;
}
add_shortcode('googlemap', 'googlemap_callback');
以下は緯度と経度、ズームレベルと地図を表示する要素の id を指定して地図を表示する例です。
[googlemap lat='40.748441' lng='-73.985664' zoom='10' id='map']
以下は緯度と経度を指定してテンプレートに記述して地図を表示する場合の例です。
<?php echo do_shortcode( "[googlemap lat='40.748441' lng='-73.985664']" ); ?>
但し、この例の場合は Googlemaps API の JavaScript(https://maps.googleapis.com/maps/api/js)で地図を表示する関数(initMap)を指定しているため、複数の地図を表示しようとするとうまく行きません。
また、複数の地図を表示しようとすると毎回 API を読み込んでしまうため「You have included the Google Maps JavaScript API multiple times on this page. This may cause unexpected errors.」と言うエラーが出てしまいます。
複数の地図の表示
以下は複数の地図を表示できるようにしたショートコードの例です。
2個め以降の地図を表示する場合は属性の multi に1など空文字や0以外を指定します(もっと良い方法があるかと思いますが)。
以下の場合は前述の例とは異なり Googlemaps API の JavaScript でのコールバックの指定ではなく、addDomListener() を使ってロード時に無名関数を実行するようにしています。
function googlemap_callback($atts){
extract(shortcode_atts(array(
'api' => 'xxxxxxxxxx', //API キー
'zoom' => '14',
'lat' => '',
'lng' => '',
'id' =>'gmap',
'multi' => '' //地図を複数表示する場合は1を指定(空文字や0以外を指定)
), $atts));
if($lat && $lng){
$output = '';
if(!$multi) {
$output = '<script src="https://maps.googleapis.com/maps/api/js?language=ja®ion=JP&key=' .$api. '" async defer></script>';
}
$output .= '<div class="map_wrapper"><div id="'.$id. '" class="gmap"></div></div>';
$output .= '<script>';
$output .= <<<EOF
var map;
google.maps.event.addDomListener(window, 'load', function(){
map = new google.maps.Map(document.getElementById('$id'), {
center: {lat: $lat, lng: $lng},
zoom: $zoom
});
})
</script>
EOF;
}else{
$output = '<p>地図の位置情報(緯度/lat 経度/lng)が指定されていません。</p>';
}
return $output ;
}
add_shortcode('googlemap', 'googlemap_callback');
以下は緯度と経度、multi を指定して2つ目の地図を表示する例です。
[googlemap lat='40.748441' lng='-73.985664'multi='1']
以下はテンプレートに記述して地図を表示する場合の例です。
<?php echo do_shortcode( "[googlemap lat='40.748441' lng='-73.985664'multi='1']" ); ?>
マーカーや情報ウィンドウの表示
以下はマーカーや情報ウィンドウを表示するショートコードの例です。
情報ウィンドウに表示するコンテンツの文字かリンクを指定した場合は、マーカーをクリックすると情報ウィンドウを表示します。情報ウィンドウに表示するコンテンツなどは必要に応じてスタイルなどを指定します。
function googlemap_callback($atts){
extract(shortcode_atts(array(
'api' => 'xxxxxxxxxx', //API キー
'zoom' => '14',
'lat' => '',
'lng' => '',
'id' =>'gmap',
'title' => '所在地', //マーカーにマウスオーバーした際に表示される文字
'animation' => 'DROP', //マーカー表示時のアニメーション(または BOUNCE)
'content' =>'', //情報ウィンドウに表示するコンテンツの文字
'link_text' =>'', //情報ウィンドウに表示するリンク文字
'link_url' => '', //情報ウィンドウに表示するリンクの URL
'multi' => ''
), $atts));
//情報ウィンドウに表示するリンクの初期化
$link = '';
//リンク文字が指定されていればリンクの URLを使ってリンクを作成
if($link_text) {
$link = '<a href="http://'. $link_url . '">' .$link_text .'</a>';
}
//コンテンツの文字が指定されていればその後にリンクを追加
$content .= ($content) ? '<br>'. $link : $link;
//緯度と軽度が指定されていれば地図を生成
if($lat && $lng){
$output = '';
if(!$multi) {
$output = '<script src="https://maps.googleapis.com/maps/api/js?language=ja®ion=JP&key=' .$api. '" async defer></script>';
}
$output .= '<div class="map_wrapper"><div id="'.$id. '" class="gmap"></div></div>';
$output .= '<script>';
$output .= <<<EOF
var map;
var map_center = {lat: $lat, lng: $lng};
google.maps.event.addDomListener(window, 'load', function(){
map = new google.maps.Map(document.getElementById('$id'), {
center: map_center,
zoom: $zoom
});
//マーカー
var marker = new google.maps.Marker({
position: map_center,
map: map,
title: '$title',
animation: google.maps.Animation.$animation
});
//コンテンツの文字かリンクが指定されていれば情報ウィンドウとクリックイベントを設定
if('$content' || '$link') {
//情報ウィンドウ
var infoWindow = new google.maps.InfoWindow({
content: '$content'
});
//マーカーのクリックイベント
google.maps.event.addListener(marker, 'click', function() {
infoWindow.open(map, marker); //marker の位置に情報ウィンドウを表示
});
}
});
</script>
EOF;
}else{
$output = '<p>地図の位置情報(緯度/lat 経度/lng)が指定されていません。</p>';
}
return $output ;
}
add_shortcode('googlemap', 'googlemap_callback');
以下は緯度と経度、コンテンツとリンクを指定して地図を表示する例です。
[googlemap lat='40.748441' lng='-73.985664' content='コンテンツ' link_text='Link' link_url='example.com']
以下は上記の記述で表示された地図のマーカーをクリックした際のスクリーンショットです。

住所から地図を表示(Geocoding API)
以下は Geocoding API を使って住所を元に地図を表示するショートコードの例です。
属性で緯度と経度を指定する代わりに住所(address)を指定します。
function googlemap_callback($atts){
extract(shortcode_atts(array(
'api' => 'xxxxxxxxxx', //API キー
'zoom' => '14',
'address' => '', //表示する地図の住所(必須)
'id' =>'gmap',
'title' => '所在地', //マーカーにマウスオーバーした際に表示される文字
'animation' => 'DROP', //マーカー表示時のアニメーション(または BOUNCE)
'content' =>'', //情報ウィンドウに表示するコンテンツの文字
'link_text' =>'', //情報ウィンドウに表示するリンク文字
'link_url' => '', //情報ウィンドウに表示するリンクの URL
'multi' => ''
), $atts));
//情報ウィンドウに表示するリンクの初期化
$link = '';
//リンク文字が指定されていればリンクの URLを使ってリンクを作成
if($link_text) {
$link = '<a href="http://'. $link_url . '">' .$link_text .'</a>';
}
//コンテンツの文字が指定されていればその後にリンクを追加
$content .= ($content) ? '<br>'. $link : $link;
//住所が指定されていれば地図を生成
if($address){
$output = '';
if(!$multi) {
$output = '<script src="https://maps.googleapis.com/maps/api/js?language=ja®ion=JP&key=' .$api. '" async defer></script>';
}
$output .= '<div class="map_wrapper"><div id="'.$id. '" class="gmap"></div></div>';
$output .= '<script>';
$output .= <<<EOF
var map;
google.maps.event.addDomListener(window, 'load', function(){
var target = document.getElementById('$id');
//ジオコーディングのインスタンスの生成
var geocoder = new google.maps.Geocoder();
geocoder.geocode({ address:"$address" }, function(results, status){
if (status === 'OK' && results[0]){
//マップのインスタンスを変数に代入
var map = new google.maps.Map(target, {
center: results[0].geometry.location,
zoom: $zoom
});
//マーカーの生成
var marker = new google.maps.Marker({
position: results[0].geometry.location,
map: map,
title: '$title',
animation: google.maps.Animation.$animation
});
//コンテンツの文字かリンクが指定されていれば情報ウィンドウとクリックイベントを設定
if('$content' || '$link') {
//情報ウィンドウ
var infoWindow = new google.maps.InfoWindow({
content: '$content',
pixelOffset: new google.maps.Size(0, 5)
});
//マーカーのクリックイベント
marker.addListener('click', function() {
infoWindow.open(map, marker); //marker の位置に情報ウィンドウを表示
});
}
}else{
alert('失敗しました。理由: ' + status);
return;
}
});
});
</script>
EOF;
}else{
$output = '<p>地図の住所(address)が指定されていません。</p>';
}
return $output ;
}
add_shortcode('googlemap', 'googlemap_callback');
以下は住所とコンテンツ、リンクを指定して地図を表示する例です。
[googlemap address='20 W 34th St, New York, NY 10001' content='コンテンツ' link_text='Link' link_url='example.com']
以下はテンプレートに記述(住所とコンテンツを指定)して地図を表示する場合の例です。
<?php echo do_shortcode( "[googlemap address='20 W 34th St, New York, NY 10001' content='コンテンツ']" ); ?>
カスタムフィールドの利用
カスタムフィールドに値が設定されている場合のみ、ショートコードを実行して地図を表示することもできます。
投稿画面で以下のようにキー(名前)が address のカスタムフィールドが設定されている場合に値に入力された住所を元に地図を表示します。
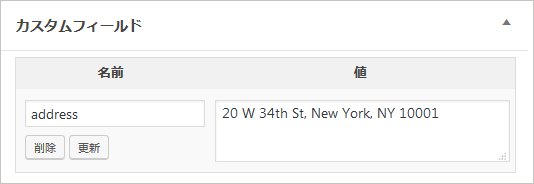
テンプレートに以下のように記述してキーが address のカスタムフィールドに値が入力されている場合のみ地図を表示するようにします。
<?php
  $address = esc_attr(get_post_meta( get_the_ID(), 'address', true));
  if($address) {
    echo do_shortcode( '[googlemap address="' . $address . '"]' );
  }
?>
他のパラメータも指定するには、独自のカスタムフィールドを用意しておくのが便利です。
独自にカスタムフィールドを追加する方法の詳細は「カスタムフィールドの使い方:独自にカスタムフィールドを追加」をご覧ください。
コードの表示
[追記] 2019年6月15日(更新:2019年6月18日)
この方法の場合、コード中に例えば「>...<」と言うような閉じられていない HTML タグが存在する場合、期待通りに機能しません(WordPress 4.2.3 以降のバグ? 詳細は以下の追記詳細を参照ください)。
プログラムのコードを表示する場合、そのまま出力することはできないので WordPress の esc_html() や PHP の htmlspecialchars() を使ってエスケープ処理してから出力します。
また、囲み方ショートコードを使うためショートコードで囲まれたコードの入力部分が the_content フィルタの整形(p タグの挿入やシングルクォートの変換)が適用されるのを回避する必要があります。
以下がコードを表示するショートコード(code)の例です。
コードの入力部分が the_content フィルタのデフォルトの整形(priority 11)が適用される前に、コールバック関数 shortcode_code() を priority 7 で the_content フィルタのフックで登録してショートコードを実行しています。
これにより the_content フィルタのデフォルトの整形が適用される際にはコードの入力部分は<pre>タグで囲まれているため整形の適用(wpautop や wptexturize)を回避できます。
※ この方法の場合、$shortcode_tags にショートコード code は登録されないので、has_shortcode() や shortcode_exists() で code をチェックしても false になります。
has_shortcode() や shortcode_exists() で code をチェックして true を返す必要がある場合は、40~41行目のコメントを外します。
function run_shortcode_code( $content ) {
  // ショートコードの登録情報($shortcode_tags)のグローバル宣言
  global $shortcode_tags;
  // 現在のショートコードの登録情報をすべてバックアップ
  $original_shortcode_tags = $shortcode_tags;
  // 現在のショートコードの登録情報を一時的にすべて削除
  remove_all_shortcodes();
  // 実行するショートコードを登録
  add_shortcode( 'code', 'shortcode_code' );
  // 登録したショートコードの実行
  $content = do_shortcode( $content );
  // バックアップしておいたショートコードの登録情報を復元
  $shortcode_tags = $original_shortcode_tags;
  // $content のコードの入力部分はエスケープされ<pre>タグで囲まれている
  return $content;
}
add_filter( 'the_content', 'run_shortcode_code', 7 );

function shortcode_code( $atts, $content = null ) {
  extract(shortcode_atts(array(
    'class' => 'code', //pre 要素に指定するクラス
    'esc' => 'true' //自前でエスケープする場合は0を指定
    ), $atts));

  //$content をエスケープ処理('true'は文字列だが true になる)
  if($esc){
    $content = htmlspecialchars($content, ENT_QUOTES, get_option('blog_charset'));
  }else{
    $content = esc_html($content);
    //esc_html() は既にエンコードされている値は二重にエンコードしません
  }

  return sprintf(
  '<pre class="%s"><code>%s</code></pre>'. "\n",
  esc_attr($class),
  $content
  );
}
//has_shortcode() や shortcode_exists() で true にする必要がある場合
/*global $shortcode_tags;
$shortcode_tags[ 'code' ] = '__return_false';*/
以下はビジュアルエディタで使用する場合の例です。表示するコードを [code]~[/code] で囲みます。
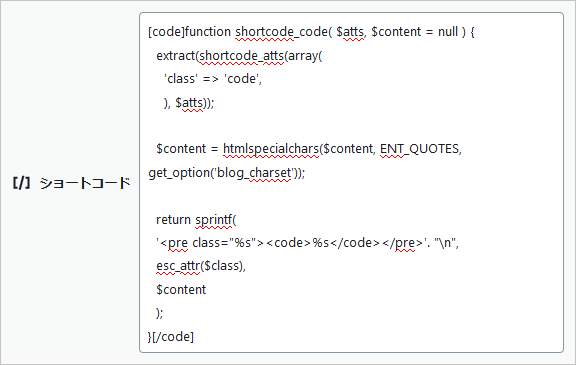
ブラウザのソースを確認すると以下のようにエスケープして出力されています。
<pre class="code"><code>function shortcode_code( $atts, $content = null ) {
extract(shortcode_atts(array(
'class' => 'code',
), $atts));
$content = htmlspecialchars($content, ENT_QUOTES, get_option('blog_charset'));
return sprintf(
'<pre class="%s"><code>%s</code></pre>'. "\n",
esc_attr($class),
$content
);
}</code></pre>
属性 esc=0 を指定しないでエスケープした値を記述した場合は、エスケープした値を更に htmlspecialchars() でエスケープするのでエスケープした値が出力されます。
esc_html() は既にエンコードされている値は二重にエンコードしません。
[追記詳細]
コード中に以下のような閉じられていない HTML タグ(> と <)が存在する場合、ショートコードの記述は期待通りに表示されません。
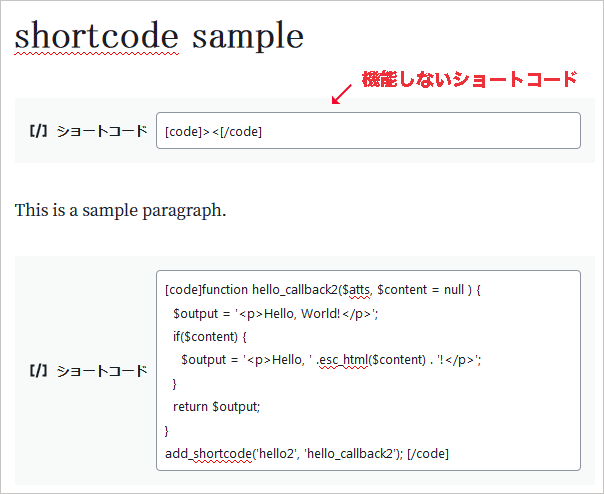
[code]><[/code]
[code]<p>test<[/code]
[code]if ( x > 50 && y < -50 ) [/code]
例えば、上記1行目のショートコードを記述すると以下のように表示されてしまいショートコードタグが正常に認識されません。
><[/code]
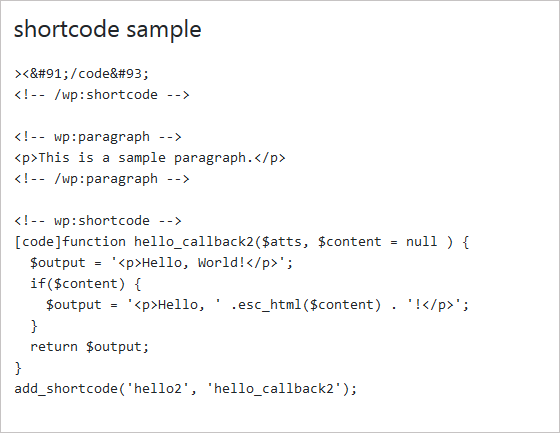
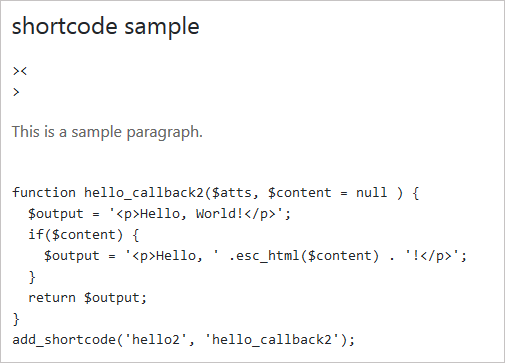
このショートコードに続いて段落や他のショートコードなどがある場合は、それらの表示にも影響が出てしまいます。
例えば以下のようなショートコードとそれに続く段落と別のショートコード(こちらは正常に認識されるコード)がある場合は
以下のように表示されてしまい、最初のショートコードの閉じタグが「[/code]」となってしまいショートコードの閉じタグとして認識されていません。
回避策
回避策としては以下のような方法が考えられます。
1.可能であれば「>」で終わるように書き換える(あまり現実的ではありませんが)。
[code]if ( x > 50 && y < -50 ) [/code]
//上記を以下に書き換える
[code]if ( y < -50 && x > 50 ) [/code]
2.属性 esc=0 を指定して予めエスケープ処理したコードを記述する(面倒ですが)。
[code esc=0]if(x > 50 && y < -50) [/code]
3.正常に認識されないショートコードの後に「>」を含む文字列を追加する。
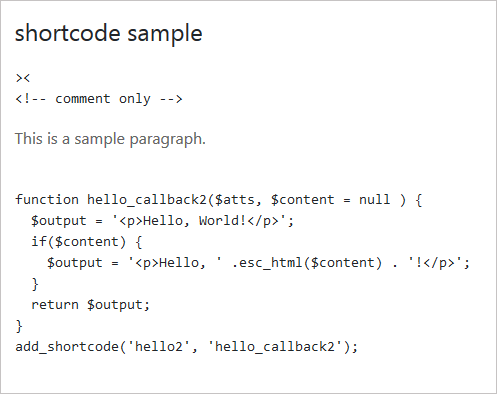
前述の例の場合、最初の正常に認識されないショートコードを以下のように記述すると(改行は必要ではありません)
[code]><
>[/code]
以下のように正常にショートコードの閉じタグが認識されて続くコンテンツに影響を与えません。
最後に「>」を追加するだけでは見栄えが悪いので、例えば「>」を含む「<!-- comment only -->」や「<!-- end of code -->」のような文字列を追加しても同じ効果が得られます。
[code]><
<!-- comment only -->[/code]
上記の場合、以下のように表示され後続のコンテンツに影響を与えないで済みます。
追加する文字列は「>」を含んでいれば良く、以下のように「>」の後に他の文字列があっても大丈夫です。
[code]><
###> Code End ###[/code]
ショートコード関連の関数
remove_shortcode
ショートコードを削除します。
remove_shortcode( $tag )
- パラメータ
- $tag(string):(必須)削除するショートコードの名前
- 戻り値
- なし
以下はデフォルトのギャラリーのショートコードを削除して、新たにギャラリーのショートコードを登録する場合の例です。
//デフォルトのショートコードの削除
remove_shortcode('gallery');
//新しいショートコードの追加(登録)
add_shortcode('gallery', 'my_gallery_shortcode');

//新しいショートコードのコールバック関数の定義
function my_gallery_shortcode($attr) {
  //コールバック関数の定義
}
以下は remove_shortcode() のソースです。
unset() でグローバル変数 $shortcode_tags(ショートコードの登録情報の配列)から該当するショートコードを削除しています。
function remove_shortcode( $tag ) {
    global $shortcode_tags;

    unset( $shortcode_tags[ $tag ] );
}
strip_shortcodes
指定されたコンテンツからショートコードタグを全て削除します。この関数は投稿から抜粋を生成する関数 wp_trim_excerpt() の内部などでも使用されています。
strip_shortcodes( $content )
- パラメータ
- $content(文字列):(必須)ショートコードタグを削除するコンテンツ
- 戻り値
- ショートコードタグを取り除いたコンテンツ
the_content フィルタを使って、ホームの場合はコンテンツに含まれるショートコードを削除して表示し、それ以外のページではショートコードを実行する場合の例です。
function remove_shortcode_from_home( $content ) {
  if ( is_home() ) {
    $content = strip_shortcodes( $content );
  }
  return $content;
}
add_filter( 'the_content', 'remove_shortcode_from_home' );
以下が strip_shortcodes() のソースです。
function strip_shortcodes( $content ) {
  global $shortcode_tags;

  if ( false === strpos( $content, '[' ) ) {
    return $content;
  }

  if ( empty( $shortcode_tags ) || ! is_array( $shortcode_tags ) ) {
    return $content;
  }

  // Find all registered tag names in $content.
  preg_match_all( '@\[([^<>&/\[\]\x00-\x20=]++)@', $content, $matches );

  $tags_to_remove = array_keys( $shortcode_tags );

  /**
   * Filters the list of shortcode tags to remove from the content.
   *
   * @since 4.7.0
   *
   * @param array  $tags_to_remove Array of shortcode tags to remove.
   * @param string $content        Content shortcodes are being removed from.
   */
  $tags_to_remove = apply_filters( 'strip_shortcodes_tagnames', $tags_to_remove, $content );

  $tagnames = array_intersect( $tags_to_remove, $matches[1] );

  if ( empty( $tagnames ) ) {
    return $content;
  }

  $content = do_shortcodes_in_html_tags( $content, true, $tagnames );

  $pattern = get_shortcode_regex( $tagnames );
  $content = preg_replace_callback( "/$pattern/", 'strip_shortcode_tag', $content );

  // Always restore square braces so we don't break things like <!--[if IE ]>
  $content = unescape_invalid_shortcodes( $content );

  return $content;
}
remove_all_shortcodes
登録されている全てのショートコードを削除します。 ショートコードが登録されているグローバル変数 $shortcode_tags の中身を空の配列で置き換えます。
remove_all_shortcodes()
- パラメータ
- なし
- 戻り値
- なし
以下はサンプル「コードの表示」で code と言うショートコードを the_content フィルタで priority 7 で登録及び実行する例ですが、code と言うショートコードのみを実行させるために、remove_all_shortcodes() を使って一旦全てのショートコードを削除しています。
後で削除したショートコードを戻すため remove_all_shortcodes() を実行する前に、ショートコードの登録情報をすべてバックアップしています。
function run_shortcode_code( $content ) {
  // ショートコードの登録情報($shortcode_tags)のグローバル宣言
  global $shortcode_tags;
  // 現在のショートコードの登録情報をすべてバックアップ
  $original_shortcode_tags = $shortcode_tags;
  // 現在のショートコードの登録情報を一時的にすべて削除
  remove_all_shortcodes();
  // 実行するショートコードを登録
  add_shortcode( 'code', 'shortcode_code' );
  // 登録したショートコードの実行
  $content = do_shortcode( $content );
  // バックアップしておいたショートコードの登録情報を復元
  $shortcode_tags = $original_shortcode_tags;
  // $content のコードの入力部分はすでにショートコード code が実行されている
  return $content;
}
add_filter( 'the_content', 'run_shortcode_code', 7 );
以下が remove_all_shortcodes() のソースです。
function remove_all_shortcodes() {
  global $shortcode_tags;

  $shortcode_tags = array();
}
has_shortcode
指定されたコンテントに特定のショートコードがあるかどうかを調べます。ショートコードは add_shortcode() で登録されている必要があります。
has_shortcode( $content, $tag )
- パラメータ
-
- $content(文字列):(必須)検索対象のコンテント
- $tag(文字列):(必須)調べるショートコードの名前
- 戻り値
- ショートコードがあれば true。なければ false。
以下は投稿のコンテンツに gallery ショートコードが含まれている場合に何らかの処理をする例です。
global $post;
$content = $post->post_content
if ( has_shortcode( $content, 'gallery' ) ) {
  //  $content に gallery というショートコードが存在する場合の処理
}
以下は投稿のコンテンツに my-shortcode と言うショートコードが含まれている場合に wp_enqueue_script() を使ってそのページに JavaScript をリンクする例です。
has_shortcode() で確認する前に、is_a( $post, 'WP_Post' ) で投稿かどうかを確認しています。has_shortcode() は大量のコンテンツをスキャンする場合、それなりのリソースを使うようです(未確認)。
function add_my_shortcode_scripts() {
  global $post;
  if (is_a($post, 'WP_Post') && has_shortcode($post->post_content, 'my-shortcode')){
    wp_enqueue_script( 'my-script', get_theme_file_uri( '/js/myscript.js' ));
  }
}
add_action( 'wp_enqueue_scripts', 'add_my_shortcode_scripts');
以下が has_shortcode() のソースです。
指定されたコンテンツ($content)に左角括弧 [ があるかを確認して、なければ終了しています。
続いて shortcode_exists() でグローバル変数 $shortcode_tags に指定されたショートコードが登録されていれば、コンテンツ内にそのショートコードがあるかを確認しています。
function has_shortcode( $content, $tag ) {
  if ( false === strpos( $content, '[' ) ) {
    return false;
  }

  if ( shortcode_exists( $tag ) ) {
    preg_match_all( '/' . get_shortcode_regex() . '/', $content, $matches, PREG_SET_ORDER );
    if ( empty( $matches ) ) {
      return false;
    }

    foreach ( $matches as $shortcode ) {
      if ( $tag === $shortcode[2] ) {
        return true;
      } elseif ( ! empty( $shortcode[5] ) && has_shortcode( $shortcode[5], $tag ) ) {
        return true;
      }
    }
  }
  return false;
}
shortcode_exists
指定されたショートコードが登録されているかどうかを調べます。
shortcode_exists( $tag )
- パラメータ
- $tag(文字列):(必須)調べるショートコードの名前
- 戻り値
- ショートコードが存在すれば(登録されていれば) true。そうでななければ false。
以下は gallery と言うショートコードが登録されている(存在する)場合に何らかの処理をする例です。
if ( shortcode_exists( 'gallery' ) ) {
  // gallery と言うショートコードが登録されている場合の処理
}
以下が shortcode_exists() のソースです。
global $shortcode_tags に指定されたショートコードのキーが存在するかを確認しています。
add_shortcode() でショートコードを登録すると、そのショートコードは $shortcode_tags に追加されます。
function shortcode_exists( $tag ) {
  global $shortcode_tags;
  return array_key_exists( $tag, $shortcode_tags );
}